Homework 4: CSS Box Model and Class Selectors
In this homework you'll practice designing a site's layout using familiar design and sketching a design to implement using the CSS box model.
The course material needed to complete this assignment was covered in classes 6 and 7.
Learning Objectives
- Analyze example websites for design elements that would be familiar to users.
- Sketch a design to plan the layout of a website.
- Adjust margins and padding using CSS properties of the box model.
- Explore fixed versus relative dimensions.
- Use CSS class selectors to style elements differently.
- Center block elements using CSS.
- Use the Inspector to examine the HTML and CSS of a page.
Help & Support Resources
We want you to get the help and support you need. Use the course's support resources for help with this assignment.
Git Repository & Codespace
-
Create your assignment repository.
Visit https://landrace.infosci.cornell.edu/courses/info1300-2026fa/repos/hw4 in your browser to create your assignment repository.
-
Open your assignment repository in GitHub.
After creating your repository, visit https://landrace.infosci.cornell.edu/courses/info1300-2026fa/repos/hw4 in your browser and follow the link to open the repository on github.com
-
Open your assignment repository as a codespace.
Submission Requirements
Professionalism means meeting the client's requirements. Not doing less and not doing more.
Your submission should meet the requirements specified for this assignment and no more (or less). If you do more than the requirements, you will receive a 0 for the assignment. If you do less than the requirements, you will receive a 0 for the assignment.
Your assignment should meet the following requirements for credit:
-
Submit your own original work (design and code) for this assignment.
No credit is provided for submitting design and/or code that is taken from the course-provided examples.
-
Your code should be original. However, the structure of the code will mirror the class examples.
The structure of your code will align with the class examples. This is to be expected. We are learning web programming and there's only so many ways to structure code to solve its problems.
-
You are required to use the methods and techniques covered in class.
No credit is provided for using methods that are not covered in this class.
You may not use any methods that have not been covered in class prior to the release of this assignment.
-
Your assignment's website should be visible in the browser and functional upon launching the development web server using Go Live.
If your assignment's website does not launch using this method or is not visible in the browser after launching the development web server, we are unable to provide any credit.
-
All files should be in the location specified in this document for credit.
Professionalism is important. Incorrectly placed files will not be graded; no partial credit is provided either.
-
Follow the submission instructions below.
Submit all materials to your GitHub repository's main branch for this assignment. When you're finished stage, commit, and push your submission to GitHub. Then fill-out the submission form to complete your submission.
Failure to complete the submission form will result in 0 credit; no submission form = no submission. No leniency. No exceptions.
Instructions
Part I: Planning a Design - Sketching
Credit: 5 points. Completion credit provided for sketches that clearly communicate the layout of the website so that another 1300 student could implement the design.
-
Review the mobile design patterns discussed in class.
Reflect on how you might incorporate these patterns into your own design for the Ithaca Zoo website.
-
Sketch a mobile website design for the Ithaca Zoo website.
Only sketch the homepage. You should sketch the entirety of the home page. The sketch should include all content that exists on the current home page.
- Design for mobile devices.
- You should have spacing on both sides of your content.
- You must include an image in your sketches.
Your sketches should be hand drawn. Do not use tools like Figma to complete this part. I am not asking you to create a wireframe or mockup. A simple black and white hand drawn sketch is all that is required for credit. Yes, digital drawings are acceptable so long as they are hand-drawn (turn off auto straighten lines feature for digital drawings).
Like we learned in class, sketches are quick drawings designed to communicate the design to other web designers. Your sketches need not be perfect nor include all content verbatim. However, you should include sufficient text so that another web designer can understand your design. Squiggly lines are okay so long as headings are spelled out, etc. You need not "draw" photos; a crossed box works fine for most images. If you're confused, refer back to our class activities.
-
Upload your sketch (or photo of your sketch) to the root of your repository as
sketch.jpg,sketch.png, orsketch.pdf.Only JPG, PNG, and PDF images are accepted. Upload a JPG if you're taking a photo of your sketch, otherwise upload a PNG.
NoteDo not upload an iphone .heic file. Do not rename an .heic file as a .jpg, .png, or .pdf file (it will not convert it, and you will get a 0 for this part.)
Part II: The Box Model
Credit: 5 points. Completion credit provided for margins and padding updated to align with sketch.
-
Open
index.htmlin the browser before we set any of the CSS properties.Notice that the text starts all the way at the edge of the screen. This doesn't look very nice, nor is it accessible. Also notice that the image is very large.
-
It is a good idea to set a default margin in the
<body>element, so that everything on your webpage will inherit the same margins, unless otherwise specified.Set
margin: 40px 80px;in yoursite.csspage. -
Change
marginback to 0 for the<body>element. -
Add a border to the
<h2>elements so that we can see the difference betweenmarginandpadding.Then change padding to
20pxfor the<h2>elements.Observe the difference between this and
padding: 0. The area inside the box is what gets larger. -
Change
marginto20px.Notice that the space outside the box increases.
-
Remove the border for the
<h2>element and reset the<h2>margin and padding back to its default. -
Implement your design for element spacing as documented in your sketch from the previous part.
You should update the margin and padding to match your sketch. You must update the margins and padding to receive credit for this part.
Part III: Fixed and Relative Dimensions
Credit: 5 points. Completion credit provided for relative width text that's not too wide or too narrow to be usable.
When text content is too wide, it becomes unusable because many people have trouble finding the next line to read when the line is too long. A good rule of thumb is to keep the width of text around 5 or 6 inches.
-
Let's try setting the width of the
<p>elements. Set the width to250px. Change your browser window size and notice that the text for<p>elements stays the same width.Setting the exact pixel value (
px) means that the element will stay that fixed size, even as the browser window size might change. This can be useful in some circumstances. However, our text doesn't look great like this. -
Set
<p>width to65%. This feels like a better width. Notice how the text changes as you resize your browser window.The text appears more readable on wider screens, but it doesn't quite look right when the browser's width is narrow, like a mobile phone.
-
Set
<p>width to100%. This will allow the text to take up the full width of its container, making it more responsive.Now, set the
max-widthproperty to800pxand resize the width of your browser from narrow to wide.Observe that the text is a readable on narrow and wide screens. It never gets too large!
Part IV: Class Selector
Credit: 5 points. Completion credit provided if the class selector is used to style the website similar to the provided design.
We practiced using CSS class selectors in the last class. Now it's your turn to practice using them to style one (or more) elements differently!
-
Create a CSS class to style the
<div>around the "Welcome" text on the Ithaca Zoo website.Try and style the div to look similar to this:
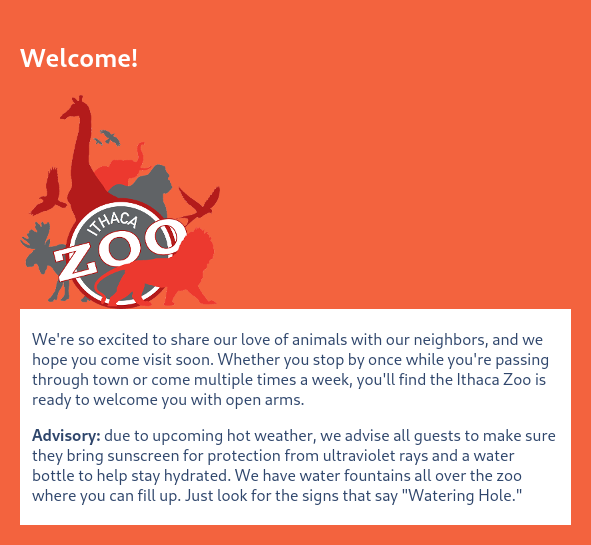 Hint
HintYou need only the
padding,background-color, andcolorproperties to style this<div>. -
Now create another CSS class to style the
<section>element with the "About the Zoo" text.Try and style the section to look similar to this:
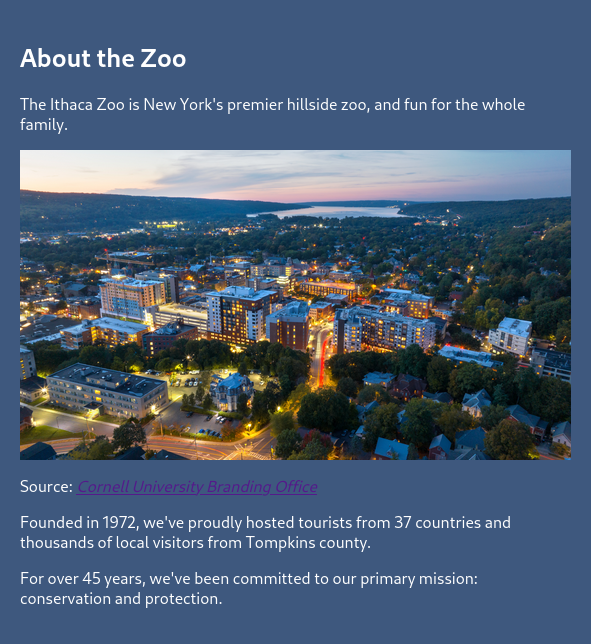 Hint
HintYou need only the
padding,background-color, andcolorproperties to style this<section>.
Part V: Centering Elements/Images
Credit: 5 points. Completion credit provided if only the logo is centered using the method provided below using only the class selector.
In order to center an element, it must be a block element. Why? Because we need to adjust the margins to center an element, and non-block elements often don't support adjusting the margins.
How do you know if an element is a block element? Check the documentation! W3 Schools provides a non-comprehensive list of block and inline elements.
Recipe: Centering an Element
-
If the element is not a block element, set
display: blockfor the element in the CSS to switch its display type toblock.note<img>elements are non-block elements;<img>is aninlineelement. -
Set the left and right
margintoauto.Left and right "auto" margins mean to set both margins equally to remaining space left over from the
widthormax-widthproperties. The resulting effect is a centered element!
Practice: Center The Ithaca Zoo Logo
Use CSS to center the Ithaca Zoo logo image on every page.
When finished, the logo you should look something like this:
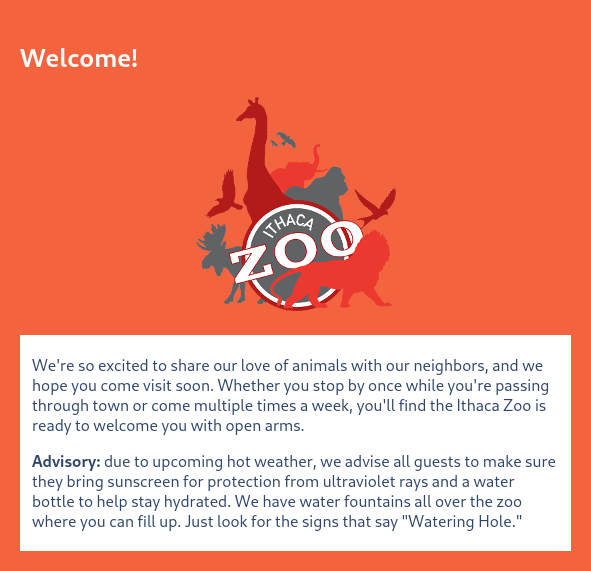
If you're having trouble with your CSS, check the Inspector in your browser's developer tools!
Part VI: Width
Credit: 5 points. Completion credit provided for a fit-width class applied to all non-logo images that keeps all images a usable width.
-
We want to control how our image scales with the browser.
We can do this by setting
max-widthandmin-widthproperties. We could set these directly on the image element, but it is more flexible if we create a class to handle this, so that we can use it for other elements later on.Create a
fit-widthclass (Remember, this class should be declared in HTML and styled in CSS, so it needs to be in both places.) -
Set the properties that we learned in class that will control the minimum and maximum width of the image for this class in the
fit-widthclass.Also add centering to the
fit-widthclass. -
Apply the
fit-widthclass to all images that are not the logo on all pages of the website. -
Observe that classes are useful when you want to style different elements the same way, so that you don't have to repeat code.
Part VII: Developer Tool Practice
Credit: 5 points. Completion credit for the See the Animals link styled to look like a button. (No credit provided for using the <button> element.)
Sometimes you can't get a margin or padding to work the way you want. Most browsers include features helpful for web developers known as the Developer Tools. The Inspector is an extremely helpful tool for troubleshooting CSS issues. We practiced using the Inspector to examine the HTML and CSS of a page in class to help us figure out why our styling wasn't working.
Refer to the Firefox's inspector reference documentation or Chrome's Developer Tools documentation for further details.
Opening the Inspector from the Developer Tools
There are two ways to open your browser's web developer tools. The first way is to open the developer tools from your browser's menu.
From Firefox's menu, select More tools, then Web Developer Tools." Use the Inspector tab to debug and troubleshoot your HTML and CSS.
From Chrome/Chromium's menu select More tools, then Developer tools. Use the Elements tab to debug and troubleshoot your HTML and CSS.
Opening the Inspector from the Context Menu
The second method for opening the developer tools inspector tab is using your browser's context menu. Right click on any element on any web page, and then select "Inspect". This will open the developer tools inspector with this element active.
Practice using the Inspector
With a peer, practice inspecting an element in the browser's Developer Tools. Learning how to inspect existing websites essentially turns any website into an example that you can learn from.
Let's learn how GitHub makes their links look like buttons!
-
Visit the following GitHub page: https://github.com/orgs/cornell-info1300-2026fa/repositories
-
Now, inspect the "New Repository" "button".
-
Next, toggle (uncheck) CSS properties for the "Go to file"
<a>element to get a sense of how each property affects the presentation of the element.Observe that this "button" isn't a button at all! It's a regular link (
<a>) styled to look like a button!HintToggle
padding,border, etc. -
With your peer discuss how the GitHub web developers managed to use CSS to style a link to look like a button.
-
Style the "See the Animals" link for the Ithaca Zoo website to look like a button.
Edit the button class in
site.cssto make this link look like a button using what you learned from inspecting GitHub's button.Your button should look something like this. It need not match exactly for credit. Something similar is all that you need to do. (You can also style it any color you like.)
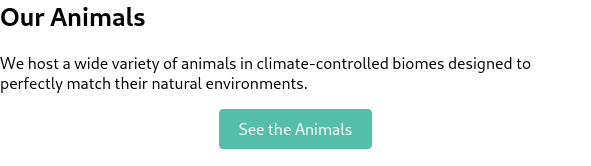
As tempting as it may be to edit your CSS in the developer tools, this is highly discouraged. Too many students forget to save their CSS when they edit in the developer tools. You are better off using Codespace to edit your code.
Submission
Stage, commit and push all changed files in your Git repository to the GitHub server. (All commits should reside on the main branch.)
Complete the submission form for hw4 to submit the assignment.
Note: The submission form asks you to check your submission. Checking your work will ensure you receive credit for this assignment. We ask you to check your submission because this is where some students lose points. It's easy to forget something and checking your work prevents the heartache of getting a 0 because your submission wasn't submitted in a way that we can access and grade it.
Contributors
Copyright © 2017 - 2026:
- Kyle Harms
- Benjamin Soltoff
- Grant Storey
- Sharon Jeong
- Axel Bax