Homework 5: Flexbox Practice
In this homework, you'll practice using CSS to lay out a page with Flexbox.
The course material needed to complete this assignment was covered in class 8.
Learning Objectives
- Plan flexbox layouts.
- Practice using CSS to add layout to a page using Flexbox.
- Leverage reference documentation to improve your understanding of HTML and CSS.
Help & Support Resources
We want you to get the help and support you need. Use the course's support resources for help with this assignment.
Git Repository & Codespace
-
Create your assignment repository.
Visit https://landrace.infosci.cornell.edu/courses/info1300-2026fa/repos/hw5 in your browser to create your assignment repository.
-
Open your assignment repository in GitHub.
After creating your repository, visit https://landrace.infosci.cornell.edu/courses/info1300-2026fa/repos/hw5 in your browser and follow the link to open the repository on github.com
-
Open your assignment repository as a codespace.
Submission Requirements
Professionalism means meeting the client's requirements. Not doing less and not doing more.
Your submission should meet the requirements specified for this assignment and no more (or less). If you do more than the requirements, you will receive a 0 for the assignment. If you do less than the requirements, you will receive a 0 for the assignment.
Your assignment should meet the following requirements for credit:
-
Submit your own original work (design and code) for this assignment.
No credit is provided for submitting design and/or code that is taken from the course-provided examples.
-
Your code should be original. However, the structure of the code will mirror the class examples.
The structure of your code will align with the class examples. This is to be expected. We are learning web programming and there's only so many ways to structure code to solve its problems.
-
You are required to use the methods and techniques covered in class.
No credit is provided for using methods that are not covered in this class.
You may not use any methods that have not been covered in class prior to the release of this assignment.
-
Your assignment's website should be visible in the browser and functional upon launching the development web server using Go Live.
If your assignment's website does not launch using this method or is not visible in the browser after launching the development web server, we are unable to provide any credit.
-
All files should be in the location specified in this document for credit.
Professionalism is important. Incorrectly placed files will not be graded; no partial credit is provided either.
-
Follow the submission instructions below.
Submit all materials to your GitHub repository's main branch for this assignment. When you're finished stage, commit, and push your submission to GitHub. Then fill-out the submission form to complete your submission.
Failure to complete the submission form will result in 0 credit; no submission form = no submission. No leniency. No exceptions.
Instructions
Part I: Framing Main Content
Credit: 5 points. Completion credit provided for framing the main content of the page and setting the background color of the HTML document.
Framing the main content is an essential part of making your content readable. When designing a website, we want to make sure that the content is not too wide, so that it will always be readable (about 5-6 inches or less). We can control this using the max-width property. We also want to draw the user's attention towards the center of the screen and so the margin properties are also helpful.
-
Without modifying the HTML, change the CSS for Part I (
styles/part1.css) to set the entire content of the page to be no wider than 800 pixels and center it on the page.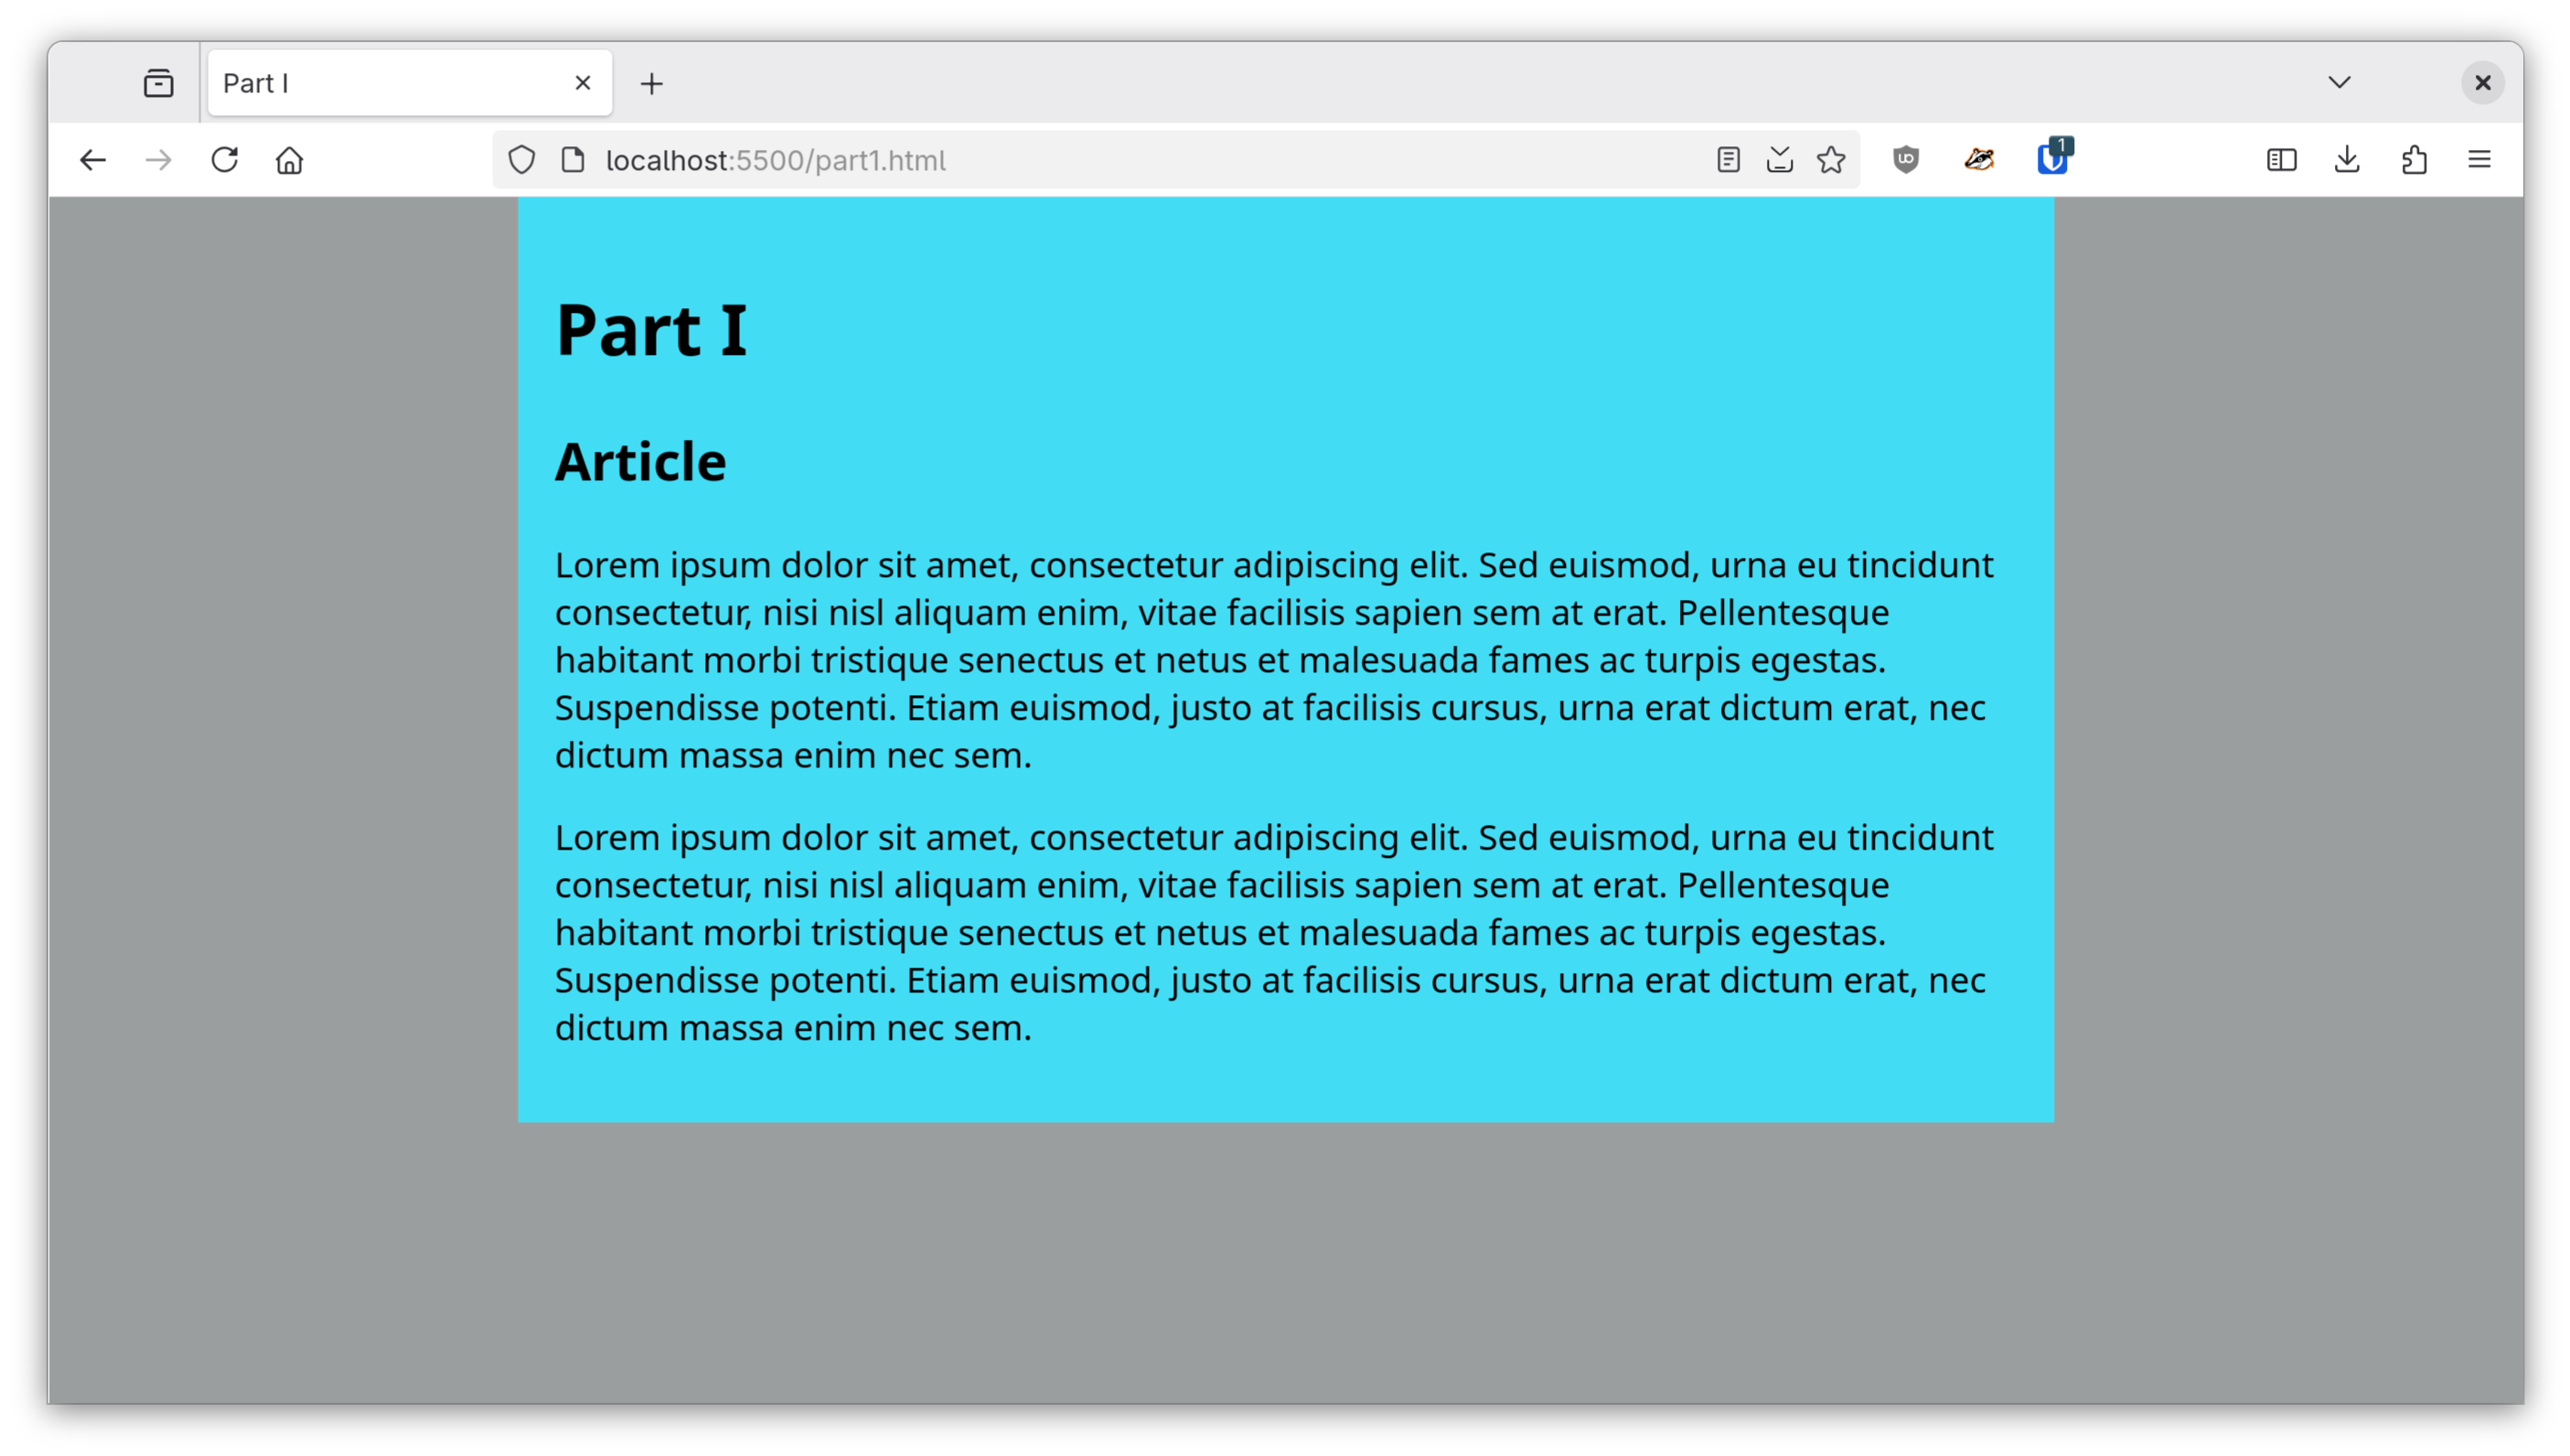
-
Set the background color the HTML document to be a gray color. (See the image above for reference.)
-
Make sure there is spacing between the content and the blue background as shown in the figure. (It's really hard to read text that is right up against the edge of a colored box.)
-
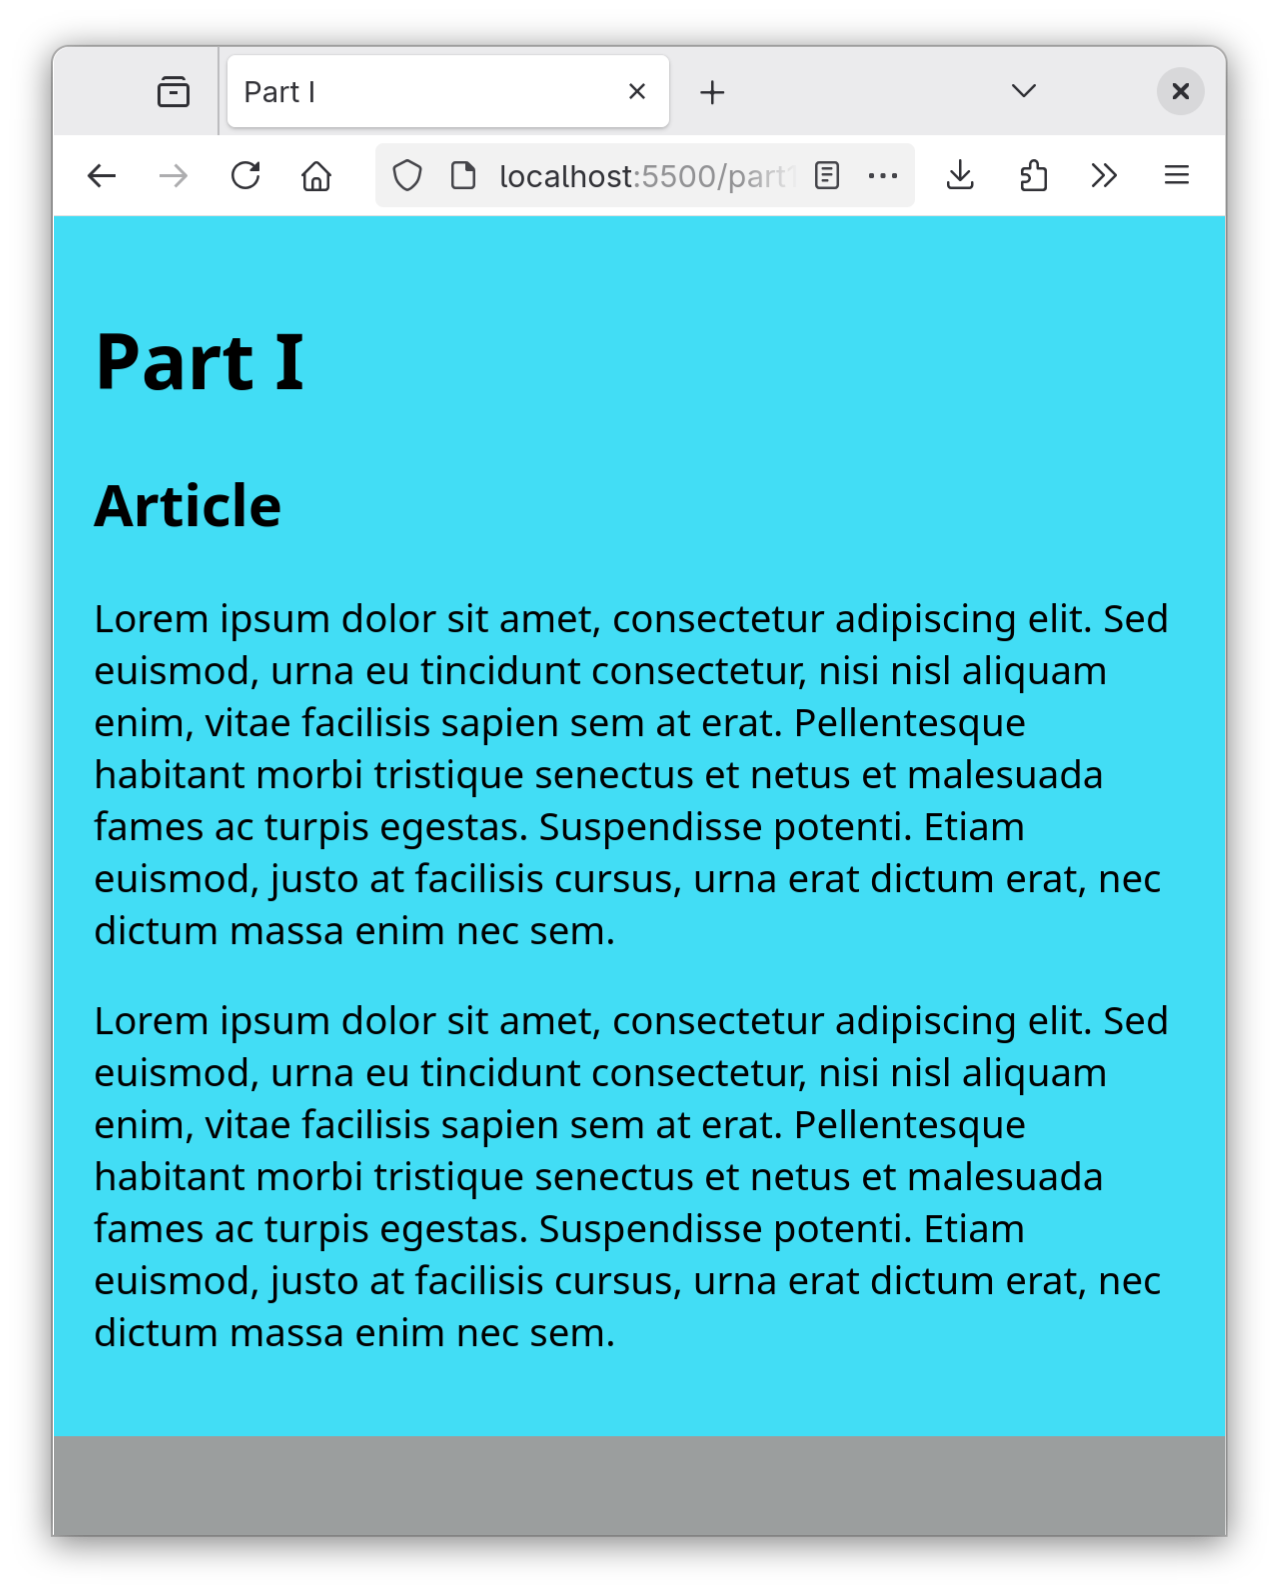
Test your page by resizing the browser window. The content should always be centered and no wider than 800 pixels. For narrow (mobile) sized screens, the content should take up the entire width of the screen.
Part II: Flexbox Practice - Grid
Credit: 5 points. Completion credit provided for a matching grid layout implemented in Flexbox. Must have 2 rows of 3 boxes each. (No credit for flex-wrap.)
In class this week, we learned and practiced the rules for layout using flexbox. In this part, you'll practice creating some common layouts using only flexbox.
When working with flexbox, you should try and plan out your layout first. It's often helpful to create a planning sketch to help you think through your ideas and the flexbox requirements. As reminder, a planning sketch is a like a design sketch, but it includes some annotations about the CSS properties you plan to use for the flexboxes.
No credit will be given for layouts not using Flexbox; you may not use floats or CSS Grid; you must use Flexbox.
-
Review the 3 steps required for flexbox in your notes from class this week.
If you're having trouble with getting your flexbox layouts to work, the first thing the course assistants will ask is about these 3 rules. Take the time to understand them so that you're prepared when seeking assistance.
-
Utilize the reference documentation.
-
Plan the Flexbox layout for part2.html.
Preview part2.html in a web browser.
Next, plan how to implement this layout using flexbox. Make sure you meet all 3 requirements for using flexbox!
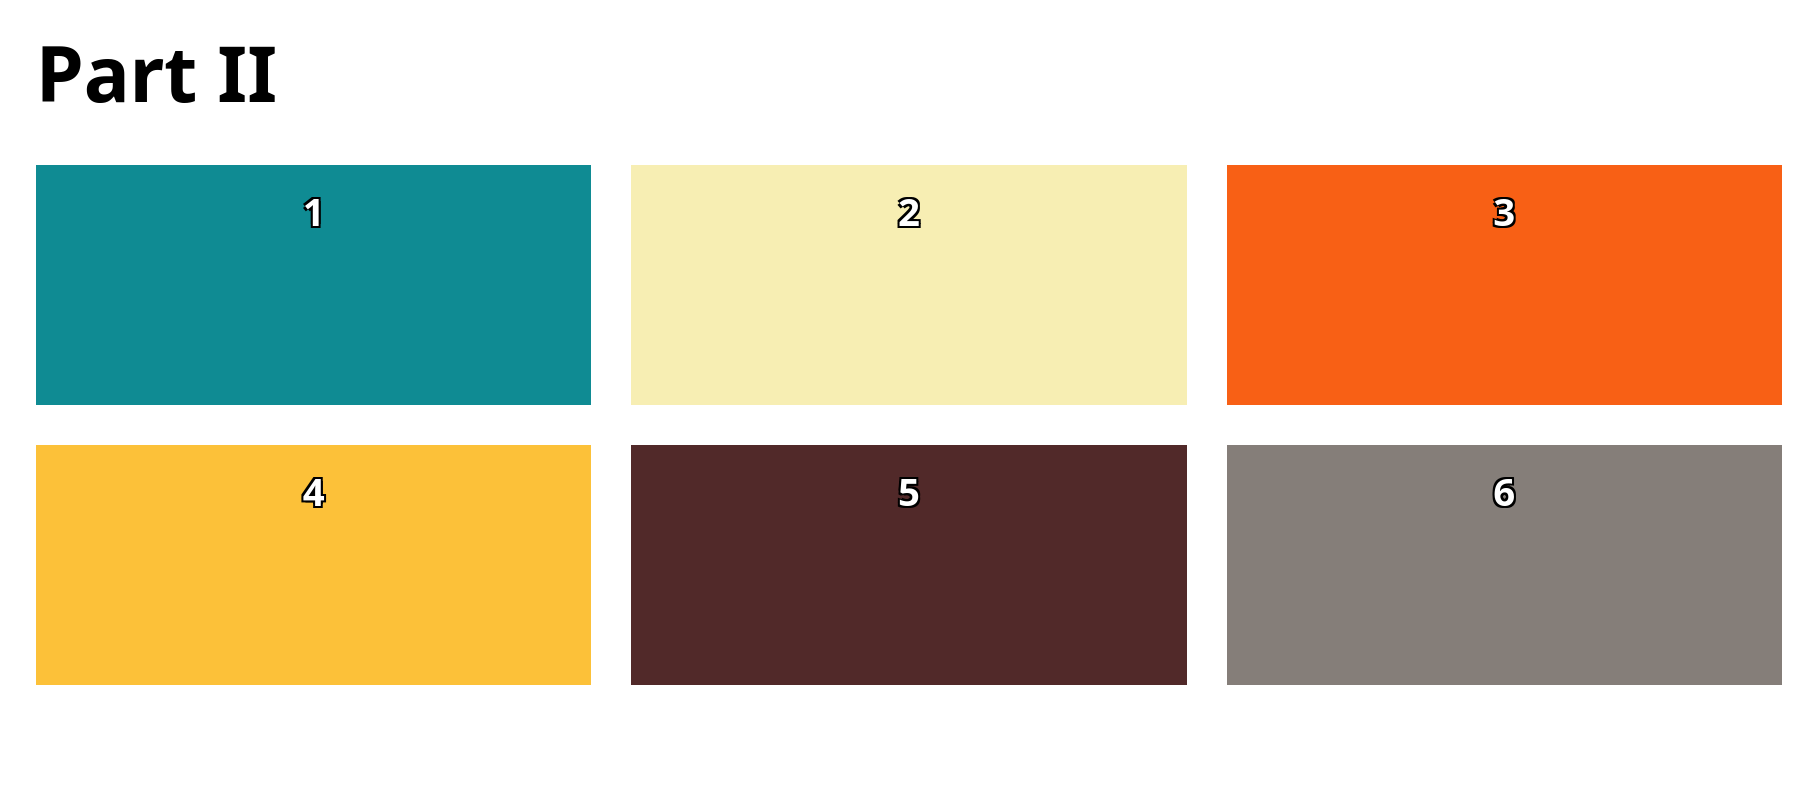
Your plan must have 2 rows of 3 boxes in each row.
-
Now that you have a plan, implement the layout.
Add CSS to styles/part2.css to make the page behave so that it matches the video below. Your implementation must have 2 rows of 3 boxes in each row.
Change the HTML if necessary.
(Ignore the "Layout 1" in the video.If the video above doesn't load, try downloading part2.mp4 and playing it on your computer.)
Focus on getting the layout correct. It's okay if the spacing is a bit off. (This assignment is about Flexbox, not pixel perfect CSS styling. We are grading your Flexbox implementation, that's it!)
tipIf you're having trouble with your CSS, check the Inspector in your browser's developer tools!
Part III: Flexbox Practice - Sidebar
Credit: 5 points. Completion credit provided for a matching sidebar layout implemented in Flexbox.
-
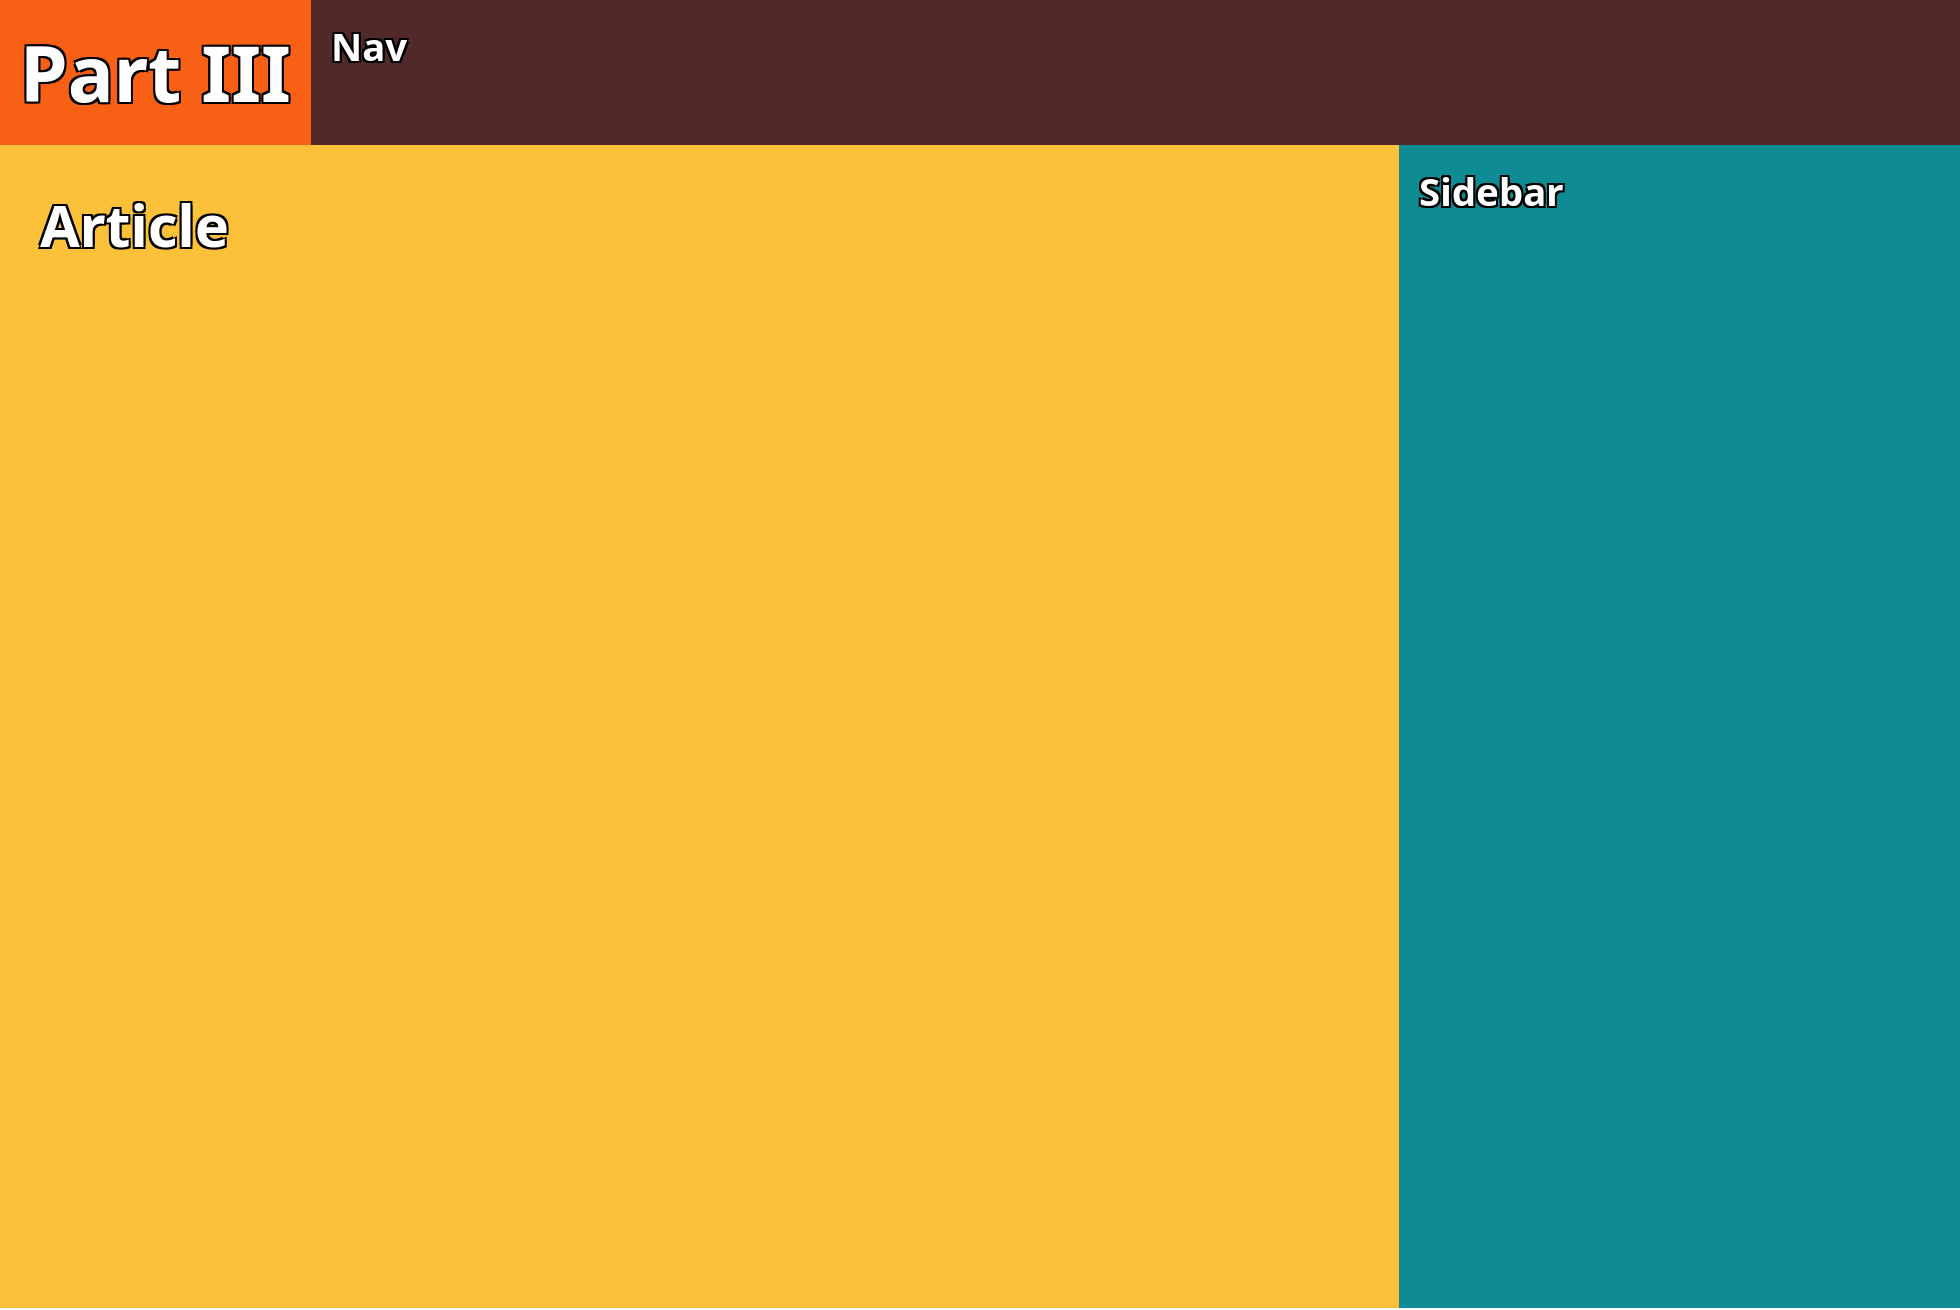
Plan the Flexbox layout for part3.html.
Preview part3.html in a web browser.
Next, plan how to implement this layout using flexbox. Make sure you meet all 3 requirements for using flexbox!
-
Now that you have a plan, implement the layout.
Add CSS to styles/part3.css to make the page behave so that it matches the video below.
Observe that most of the CSS in styles/part3.css is missing. Add CSS to styles/part3.css. No changes to the HTML are necessary. But you may change it if you want.
(Ignore the "Layout 2" in the video. If the video above doesn't load, try downloading part3.mp4 and playing it on your computer.)
Do not worry if the colors do not match exactly. The layout is what is important. Not the colors.
tipIf you're having trouble with your CSS, check the Inspector in your browser's developer tools!
ChallengeMake the sidebar element a fixed size so that only the main content changes size when the browser window is resized.
Part IV: Nested Flexboxes
Credit: 5 points. Completion credit provided for a matching nested flexbox layout.
Sometimes it's necessary to create flexboxes inside of other flexboxes. This is called nesting flexboxes. In this part, you'll practice nesting flexboxes.
-
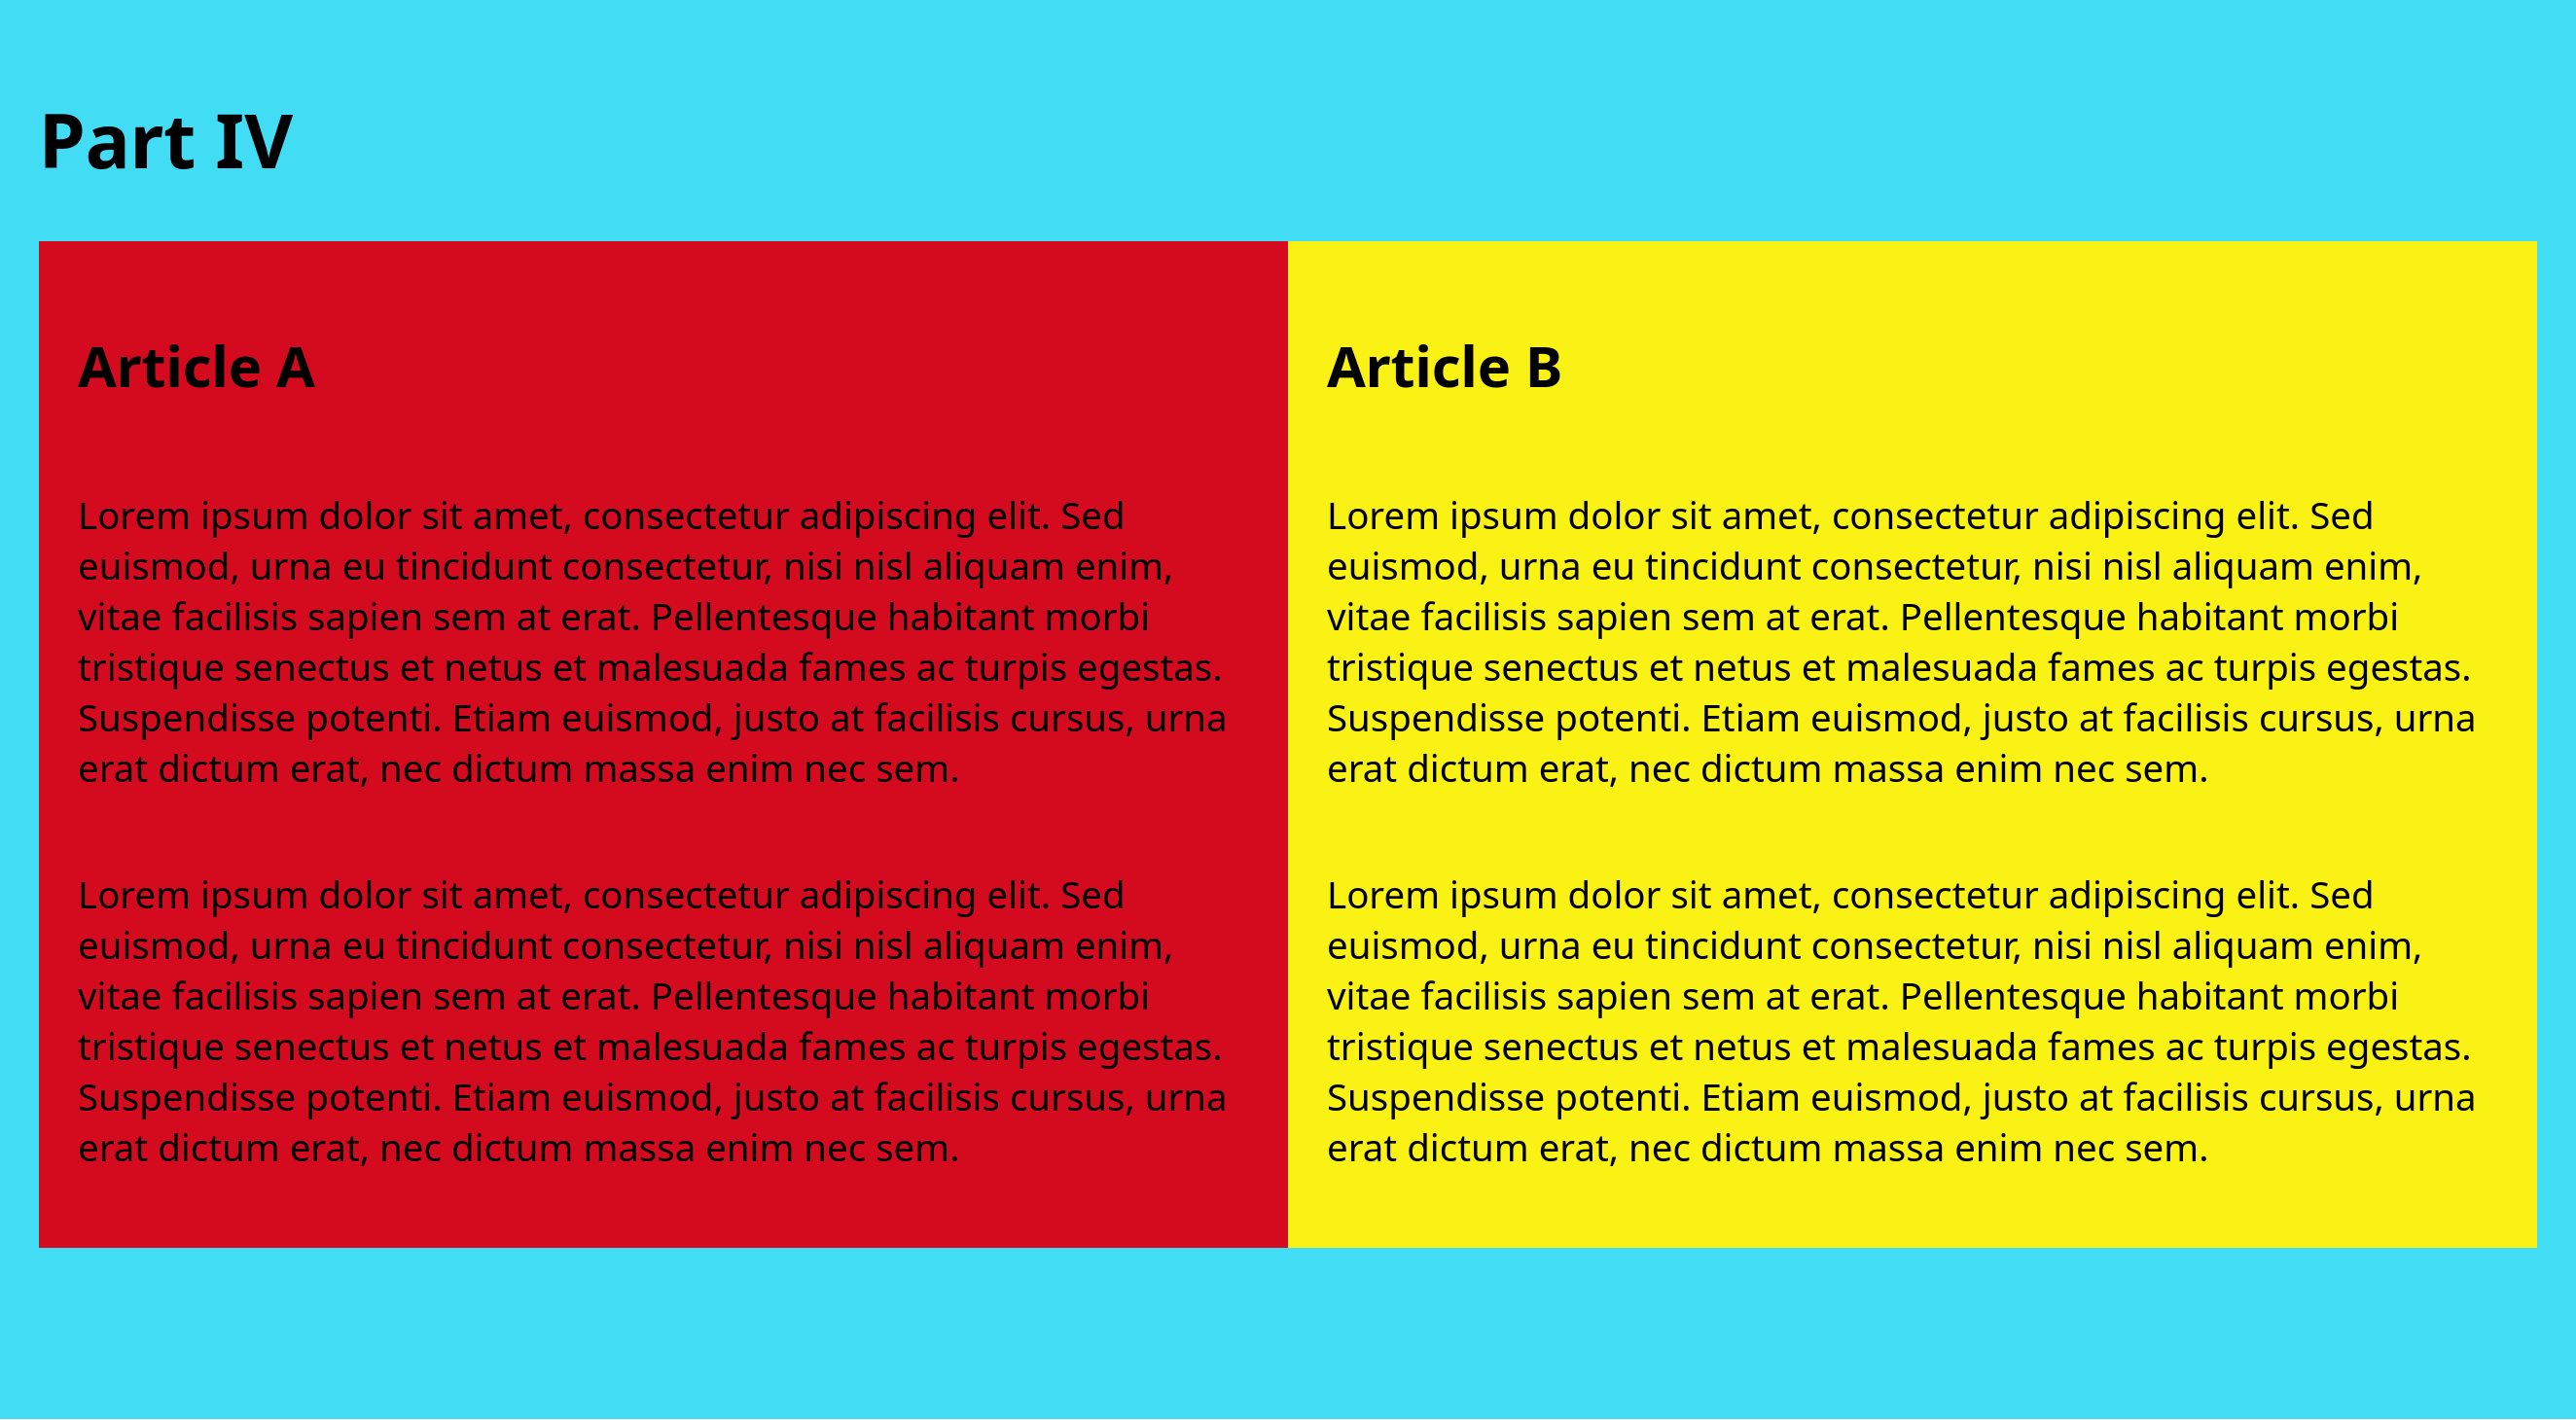
Plan and create a flexbox to layout Article A and Article B side-by-side.
You should not need to change the HTML for this step.
-
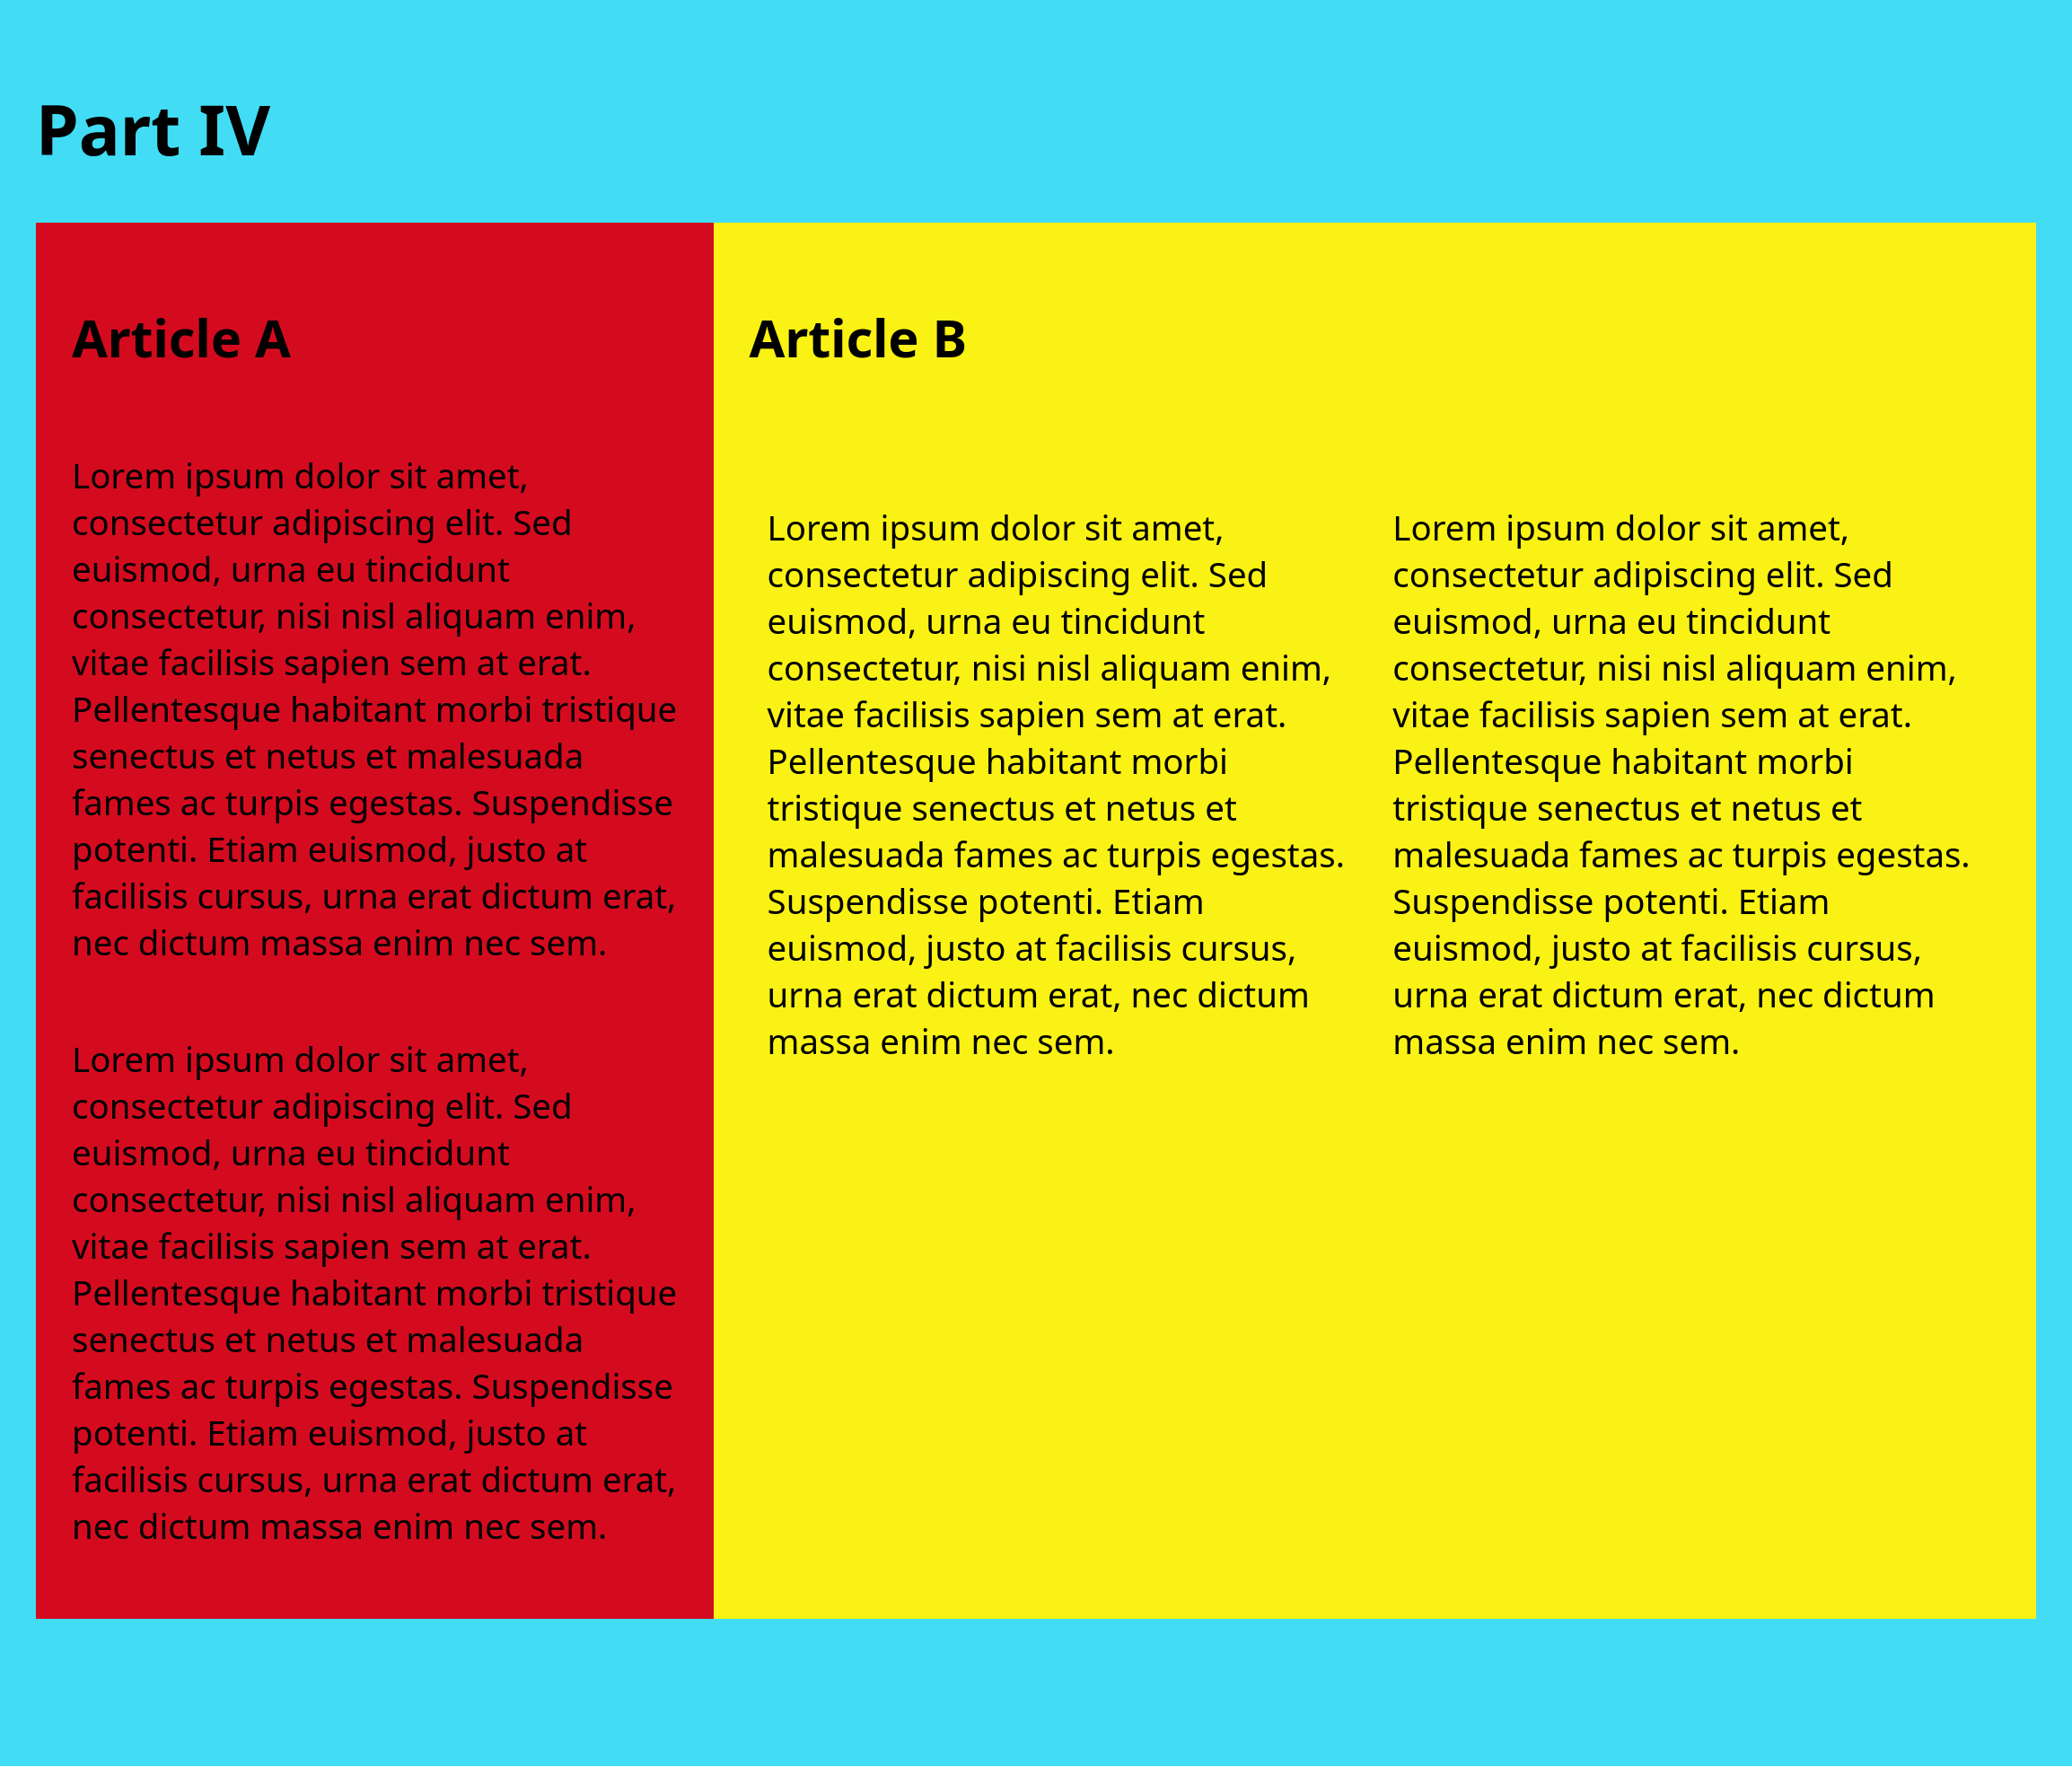
Next, make the paragraphs in Article B appear side-by-side as well.
Only Article B's paragraphs should be side-by-side; do not change the layout of the Article B heading.
You may change the HTML if necessary for this step.
Submission
Stage, commit and push all changed files in your Git repository to the GitHub server. (All commits should reside on the main branch.)
Complete the submission form for hw5 to submit the assignment.
Note: The submission form asks you to check your submission. Checking your work will ensure you receive credit for this assignment. We ask you to check your submission because this is where some students lose points. It's easy to forget something and checking your work prevents the heartache of getting a 0 because your submission wasn't submitted in a way that we can access and grade it.
Contributors
Copyright © 2017 - 2026:
- Kyle Harms
- Grant Storey
- Sharon Jeong
- Axel Bax