Project, Milestone 3: Responsive Website
Credit: ~80 points. Graded for correctness against the requirements provided in the document.
For this project, you will design and code an original, ambitious, usable, and accessible responsive static 3–5 page interactive website from scratch designed for a cohesive audience with substantial content (primarily text).
This is an opportunity for you to demonstrate your front-end web design and development knowledge and showcase your creativity in a portfolio-worthy website.
Your website may be about anything. It's your choice. It might be a personal/professional website; it might be a site that emphasizes some aspect of your interests or activities (e.g. a hobby or an interest of yours, etc.)
Throughout this project, you will employ the user-centered design process to design and code your website for a cohesive audience with clear goals. You are required to design and plan your site first, and then code it.
As a general rule, use the methods and strategies we've learned and practiced in class. In web programming, there are many ways to solve a coding problem. For credit, you should only use the approaches presented in this class.
Learning Objectives
- Redesign an existing website.
- Apply visual design principles to communicate effectively with the users.
- Design and implement a responsive website. One that works well on wide screens and narrow screens.
- Design usable client-side interactivity to assist a website's audience in accomplishing their goals.
- Design usable interactivity that effectively uses affordances, visibility, feedback, and familiarity.
- Use HTML, CSS, and JavaScript together to facilitate client-side interactivity.
- Co-program with generative AI to program more effectively.
- Evaluate generative AI output for correctness and appropriateness.
- Use reference documentation to solve coding problems.
- Evaluate your own work against a set of requirements.
Help & Support Resources
We want you to get the help and support you need. Use the course's support resources for help with this assignment.
Git Repository & Codespace
-
Create your assignment repository.
Visit https://landrace.infosci.cornell.edu/courses/info1300-2026fa/repos/project in your browser to create your assignment repository.
-
Open your assignment repository in GitHub.
After creating your repository, visit https://landrace.infosci.cornell.edu/courses/info1300-2026fa/repos/project in your browser and follow the link to open the repository on github.com
-
Open your assignment repository as a codespace.
Submission Requirements
Professionalism means meeting the client's requirements. Not doing less and not doing more.
Your submission should meet the requirements specified for this assignment and no more (or less). If you do more than the requirements, you will receive a 0 for the assignment. If you do less than the requirements, you won't receive full credit.
Your assignment should meet the following requirements for credit:
-
Submit your own original work (design and code) for this assignment.
No credit is provided for submitting design and/or code that is taken from the course-provided examples or other assignments.
-
Your code should be original. However, the structure of the code will mirror the class examples.
The structure of your code will align with the class examples. This is to be expected. We are learning web programming and there's only so many ways to structure code to solve its problems.
-
You are required to use the methods and techniques covered in class.
No credit is provided for using methods that are not covered in this class.
You may not use any methods that have not been covered in class prior to the release of this assignment.
-
Your assignment's website should be visible in the browser and functional upon launching the development web server using Go Live.
If your assignment's website does not launch using this method or is not visible in the browser after launching the development web server, we are unable to provide any credit.
-
All files should be in the location specified in this document for credit.
Professionalism is important. Incorrectly placed files will not be graded; no partial credit is provided either.
-
All textual content and images should be visible in the design journal when using "Markdown: Open Preview" for credit.
If it's not visible in the Markdown preview, then we can't grade it. We also can't provide partial credit either.
All images in Markdown must be web-safe formats:
.jpg,.jpeg,.png, or.gif. No credit is provided for images in other formats. -
Follow the submission instructions below.
Submit all materials to your GitHub repository's main branch for this assignment. When you're finished, stage, commit, and push your submission to GitHub. Then fill-out the submission form to complete your submission.
Failure to complete the submission form will result in 0 credit; no submission form = no submission. No leniency. No exceptions.
Milestone Requirements
Your milestone and final submission should adhere to these requirements.
Scope Requirements
-
Your website may be about anything of your choosing.
It's your choice. It might be a personal/professional website; a portfolio website; it might be a site that emphasizes some aspect of your interests or activities (i.e. a hobby or an interest of yours, etc.)
-
Your website should be original, ambitious, usable, and accessible.
The website you design and code should be 3–5 pages, each with substantial content.
Your website should demonstrate your creativity and mastery of front-end web design and development. A website that is "minimalist" or "plays it safe" will not receive full credit.
-
Your website should be impressive.
This project should demonstrate your mastery of the course learning objectives and that you can apply them in a professional context.
You need to go beyond the basic examples provided in lecture and homeworks.
-
Design and code your website from scratch.
You may not use any pre-existing website templates, web builders, themes, or frameworks (e.g. Wix, TailwindCSS, etc.)
You may not copy an existing website and modify it; you may not redesign an existing website.
You must design and code your website from the ground up.
-
Your website should have substantial content.
Each page should be content-rich with substantial content. Nothing should be minimal.
The majority of the content should be written text. However, you are also required to include images as decoration and content.
Your website's content should not be primarily images. (You are not designing an image gallery; you are designing a content-rich website.)
-
Your website should be static.
The website will be coded using HTML and CSS only in this milestone. (JavaScript will be added in the next milestone.)
-
The website should be in English.
We cannot grade websites in other languages; no credit is provided for non-English websites.
Design Process Requirements
-
Plan before you code.
Plan your website in the design journal before coding.
The design journal is used to document your entire design process from start to finish.
-
Thoroughly document your design process and provide a rationale for your design choices.
We want to see the ideas that you considered, but didn't make the final cut. We want to see the evolution of your design and your reasons for changing it.
We want to understand the design decisions you made.
-
Plan your interactivity's design through hand-drawn design sketches.
Design sketches do not include any HTML or CSS annotations. The only annotation that should exist is a natural language description of the interactivity's behavior (i.e. When x happens, do y).
-
Plan your interactivity's implementation though interactivity planning sketches.
Your planning sketches should include all HTML elements needed for the interactivity like we practiced in class; annotations for the element types, their unique IDs, and CSS classes; and lastly the initial CSS classes.
-
Interactivity code is planned using pseudocode.
Pseudocode is a natural language (i.e. English) explanation of the code.
Pseudocode is not JavaScript. No credit provided for JavaScript code.
Your pseudocode must include the CSS selectors for the elements (e.g.
#hamburger-button) and the CSS class names that are added or removed (e.g..hidden). No credit for pseudocode without selectors and/or class names. -
All design/planning content, including images, should be legible and visible in your design journal when using "Markdown: Open Preview".
If we are unable to understand or read your handwriting, we are unable to provide any credit.
We are unable to provide credit for design content, including images, not visible in the Markdown preview.
Design Requirements
-
Revise your existing project design to incorporate client-side interactivity: a hamburger drop-down navigation menu and a modal.
It's rare that a design is perfect on the first try. Revision is an important skill for professional designers and programmers.
Revise your existing project design to incorporate static client-side interactivity that enhances your audience's experience and helps them accomplish their goals.
-
Your static client-side interactivity (hamburger drop-down navigation menu and a modal) should be well-designed and accessible. It should employ visual design principles and interaction design principles.
Your design should make effective use of accessible visual and interaction design principles: alignment, hierarchy, contrast, proximity, affordances, visibility, feedback, familiarity, etc.
Your design should include both a hamburger navigation drop-down menu and at least one modal.
Your hamburger button and menu should exist on every page of the website for narrow widths. The hamburger button and menu should not be present for wide widths.
You need to design at least one modal for the website. The modal should be used to enhance your audience's experience and help them accomplish their goals. (A modal is not a cookie banner; no credit is provided for any type of banner.)
-
The interactivity should be ambitious, significant, and reasonably complex.
This project should demonstrate your mastery of the course learning objectives. Your interactivity should be impressive. You need to go beyond the basic examples provided in lecture and homeworks. Designing a hamburger menu and one modal meets this requirement. Copying the course provided examples and modifying them does not.
Your interactivity's design should not include animations. Do not implement hover interactivity that could have been implemented with CSS (i.e.
:hover).You may design additional interactivity if you wish, however no credit is provided.
-
The interactivity should be styled to match the existing design of your website.
The interactivity should look like it belongs on the site. We are asking you to add a feature to an existing site and fully integrate it into the design; the interactivity should not appear "tacked on" and simply added to the site because this project made you do it.
The design of all buttons should match the aesthetic of the design of your website. No credit is provided for using the default browser styles for buttons.
-
All interactivity should enhance your audience's experience and help them accomplish their goals.
Interactivity should serve a purpose in relation to the audience's goals. Avoid adding interactivity for the sake of adding interactivity.
tipAsk yourself "if I were a user of this site, would I find this interactivity frustrating/annoying or helpful?" If your answer is helpful, you're probably on the right track!
-
Your interactivity should be familiar to your site's audience by employing common interactivity design patterns.
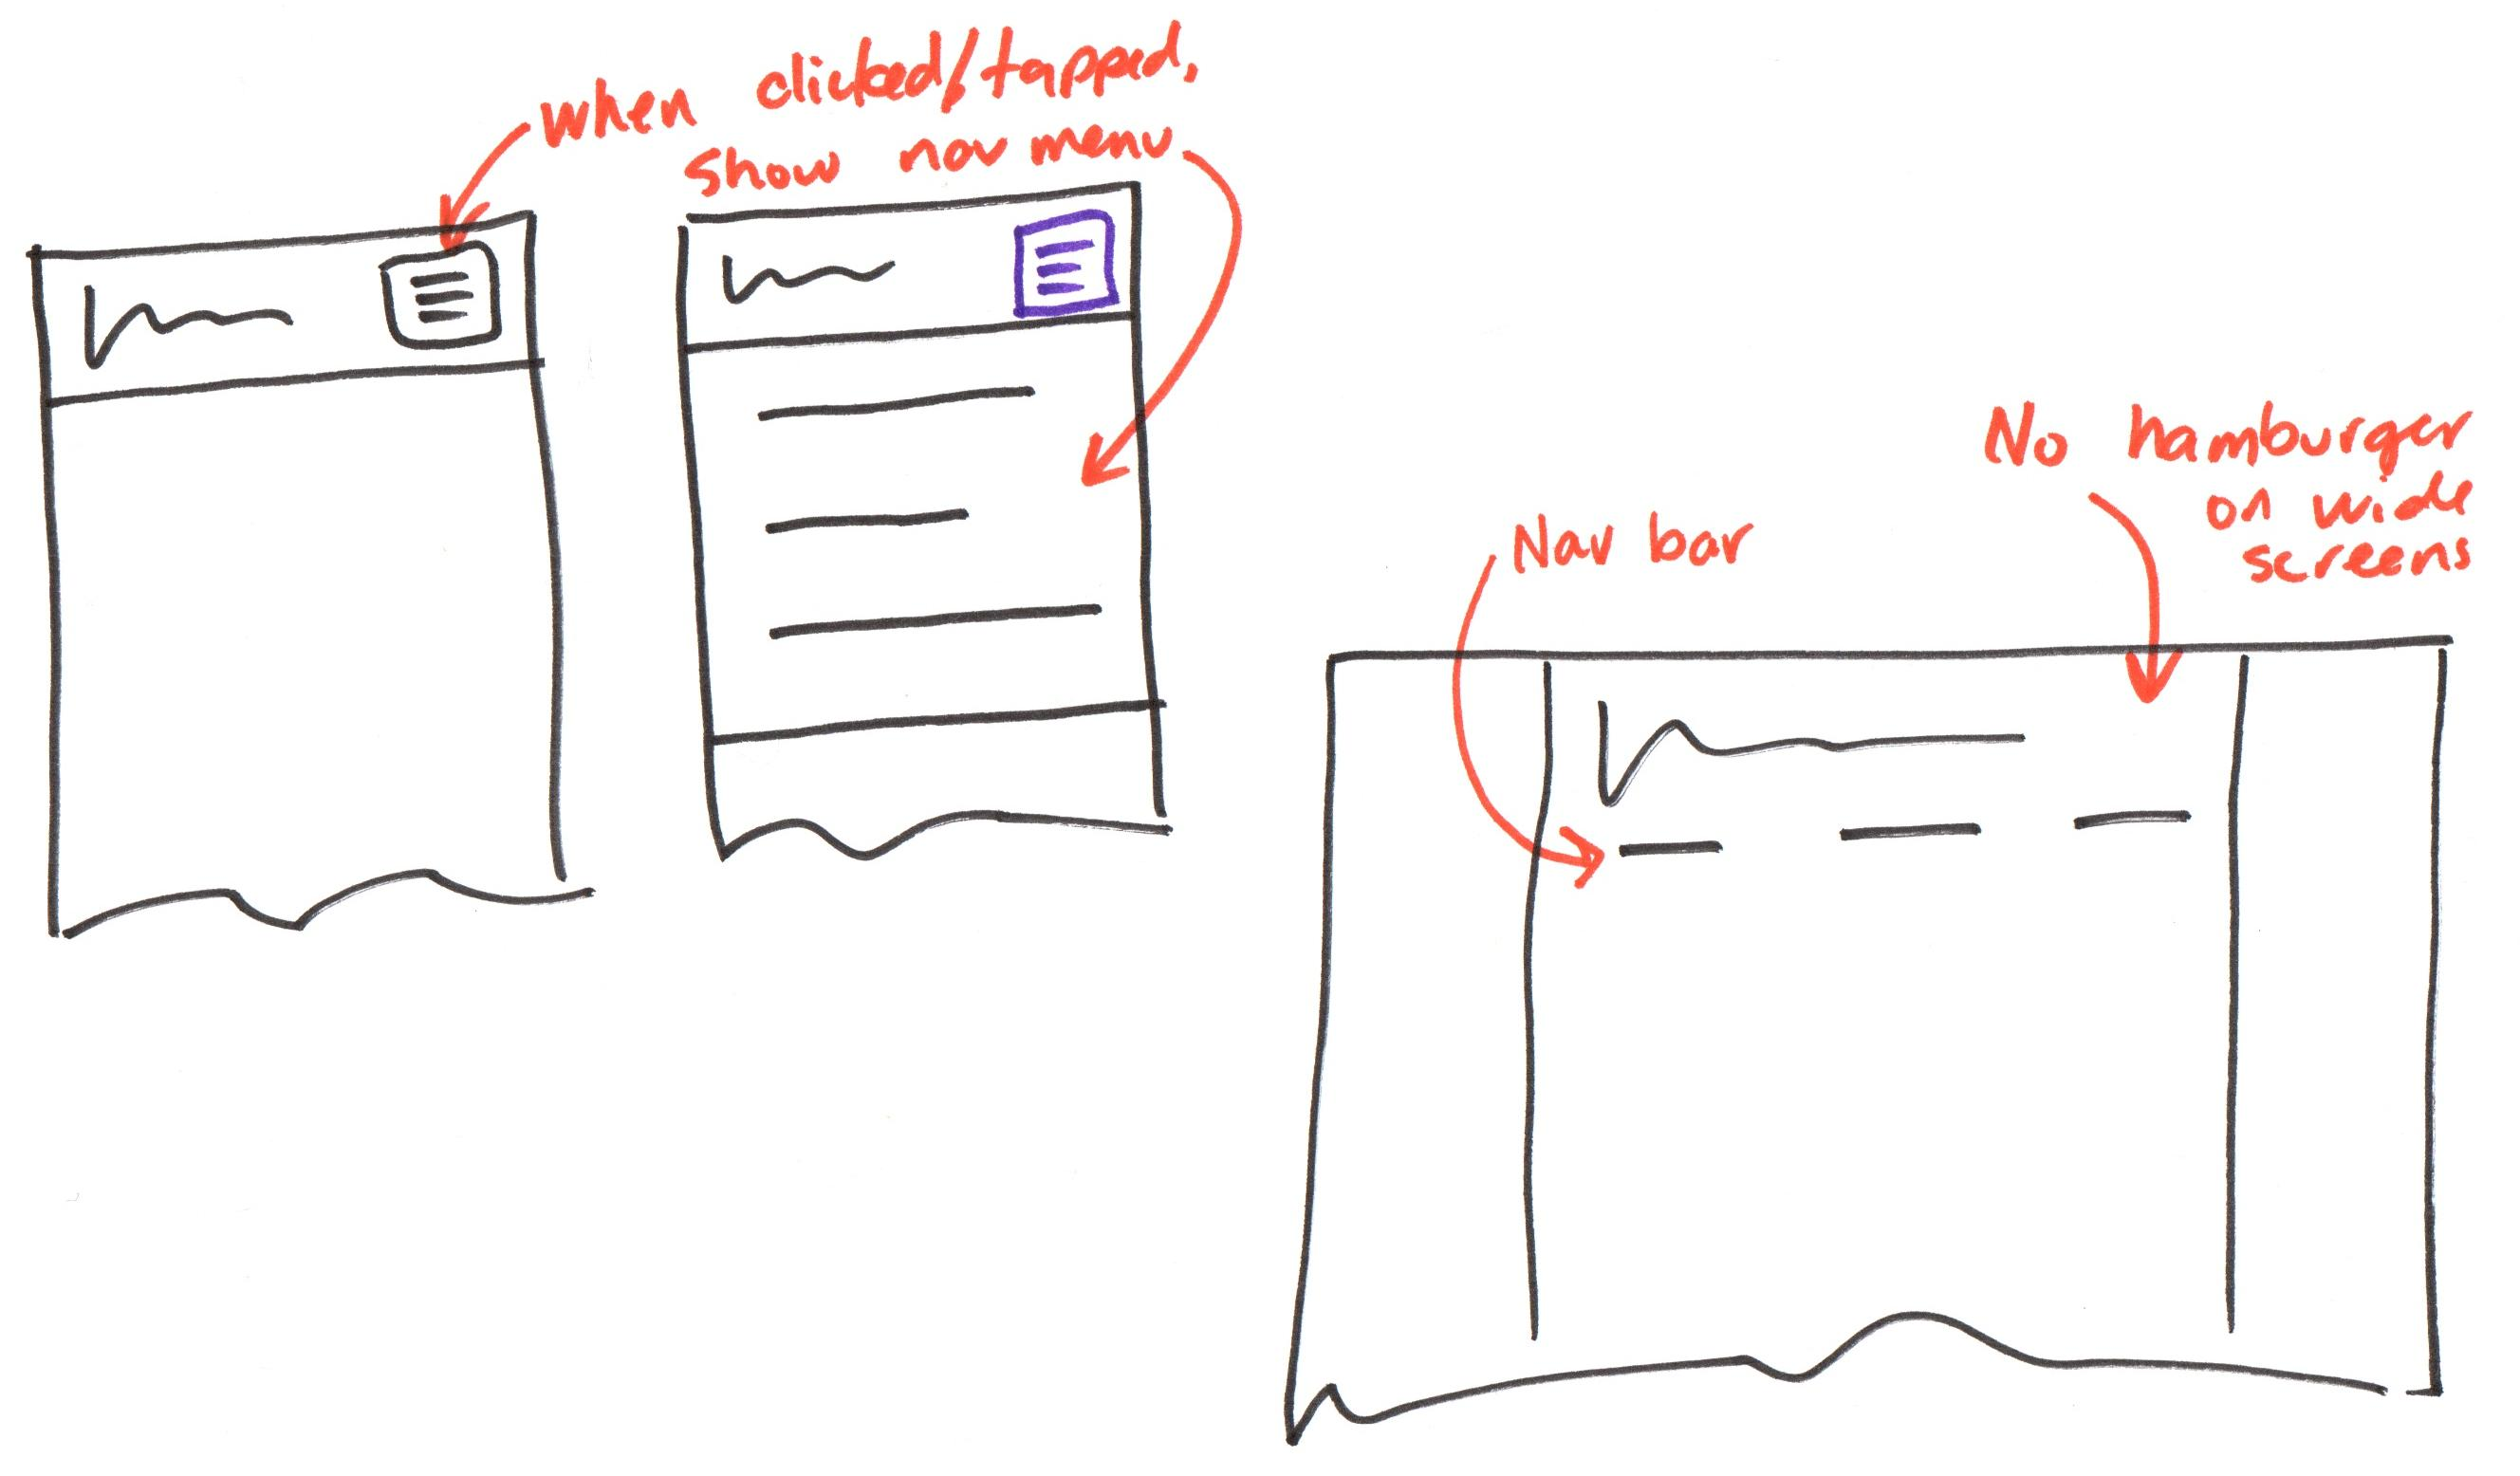
Your hamburger drop-down navigation menu should be a small button that appears at the top of the screen for narrow widths only. When clicked/tapped the full navigation menu should appear. When clicked again the navigation menu should be hidden away. (i.e. toggle) The hamburger menu should appear on every page of the website. A traditional navigation bar should be used for wide widths; no hamburger menu (i.e. hamburger button) should be visible for wide widths.
Your modal should be a pop-up element that appears over the top of the web page when an element is clicked. (This is often used in a grid of thumbnails to show a larger version of an image when the user clicks/taps a thumbnail.) The modal should appear over the entire page and prevent clicking of the page underneath. The user should be able to close the modal with a close button in the top right-hand corner. The website should be visible underneath the modal with some form of transparency effect. The modal should fill the entire screen for narrow and wide widths. No scrolling should be necessary to use the modal.
-
The design of your implemented responsive website should be based on your planned responsive design from the first milestone.
You may revise your design as you implement it. However, your implemented design should resemble your planned design.
-
Your website's design (including interactivity) should be fully responsive and ensure content is always usable regardless of screen width or pointing device.
The website should be usable on both wide screens (i.e. desktop/laptop) and narrow screens (i.e. mobile devices).
The website should be usable on both fine pointer (i.e. mouse/trackpad) and coarse pointer (i.e. touchscreen) devices.
-
The implemented fully responsive design of your website should be polished, professional, and complete.
It should be polished and ready to use in your portfolio. It should appear to be a professionally authored website.
Remember, details matter for professional work. Little misalignments, inconsistent spacing, using the default browser style, etc. will detract from the professionalism of your design. For full credit your design should be extremely polished.
-
The design of your website should be 3-5 pages, usable, and address the goals of your audience.
The content should be organized and structured to meet the goals of your audience.
For example, the current page should be clearly indicated in the navigation. Important content should be located prominently and not take a backseat to decoration (e.g. some hero images).
-
Your implemented design should be reasonably complex and ambitious.
Your design should have many flexboxes. Some flexboxes should be nested inside other flexboxes. (Yes, it counts if your interactivity design uses flexboxes.)
Your design should be interesting. It should probably use colored boxes, decorative images, and interesting decorative elements. If your design is "minimal", you should expect a lower design grade. Your website's design should impress.
-
Your implemented design should employ the principles discussed and practiced in class.
Prioritize content over decoration. (But don't forget decoration entirely! Decoration is important for a professional quality design.)
Your design should employ common web, responsive, and interactivity design patterns.
Your design should employ visual and interaction design principles to communicate effectively with your audience.
The main body should have a maximum width to ensure readability that does not require any horizontal scrolling.
-
Your implemented design should employ familiar web design patterns.
At minimum, this includes the following for every page:
- A header with a logo and page title
- A navigation bar that is the same for all pages
- A footer
Website Requirements
-
Prepare your website for implementing the interactivity in the next milestone using only HTML and CSS. (JavaScript is prohibited for this milestone.)
Add all the HTML element you need for the interactivity (including any "hidden" ones.) Add the CSS classes needed for your interactivity. Style the interactivity to align with your planned design so that the page loads with the interactivity correctly initialized for the user to use the website.
-
Prepare your accessible interactivity using only the methods and techniques covered in class.
If you use any methods or techniques not covered in class for your interactivity, you will receive 0 credit for this milestone. This includes any of the HTML and CSS only interactivity techniques listed under Prohibited.
-
Your multipage website should be fully responsive and implemented as mobile first using only HTML and CSS.
Modify the code for your existing narrow screen website to be fully responsive for wide screens and narrow screens.
Modify the code for your existing website to be fully responsive for fine screen pointers (i.e. mouse/trackpad) and coarse screen pointers (i.e. touchscreens).
-
Use only responsive methods and techniques covered in class.
You are required to use relative dimensions and min and max dimensions.
You are required to use media queries.
You are required to implement at least one responsive image using the
<picture>element with at least one<source>element.No credit is provided for using responsive methods that are not covered in this class. (You may not use JavaScript for responsiveness.)
-
Your implementation should include many flexboxes, including some nested flexboxes.
The flexboxes should impact the layout in some meaningful way; no credit is provided for simply using column flexboxes (inside of column flexboxes) for elements that would have been stacked vertically anyway. (You need to demonstrate that you understand flexboxes and can use them effectively.)
-
Your HTML and CSS code should employ the best practices covered in class.
For example, your HTML and CSS code should be properly indented and include minimal duplicate code (i.e. do not copy and paste CSS code to style multiple elements; use classes instead). Your homepage should be named index.html (all lowercase) and should reside at the root of your repository.
In industry your boss will expect your code to employ best practices, and they will not provide you a rubric of those practices. While not listed here, your code is expected to follow all best practices covered in class.
-
Your website's content, including the interactivity, should be accessible.
Content should be visible and usable by all users, including users with disabilities.
Your content should be well-structured using appropriate HTML elements.
You should use appropriate
alttext for all images.Use HTML buttons (
<button>) for all user actions for your interactivity.<button>elements are important for the accessibility of your interactivity. Never use<button>for links (i.e.<a>). It is not accessible!Your website should never require horizontal scrolling; all content should fit within the viewport width and not overflow beyond the viewport/screen's width.
-
All media files (i.e. images, videos, etc.) should be located in an
imagesormediafolder at the root of your repository.If you include video files, they should be less than 10MB each. (GitHub has file size limits.)
-
Use only external styling with exactly one CSS file. Do not use inline or internal styling.
Use a single CSS file for the entire site:
styles/site.css. All styling should be defined in this file.Do not use inline (
style="") or internal (<style>) styling. -
Cite all content according to the course citation policy.
-
HTML and CSS is free of errors (warnings okay) when validated.
Prohibited
If any of the following prohibited items are included in your milestone, you will receive no credit for the entire milestone. No exceptions.
-
Your interactivity should not be functional for this milestone.
You may not use HTML and CSS only techniques to implement functional interactivity. (You may only use HTML and CSS to initialize your interactivity.)
All interactivity (e.g. showing/hiding your hamburger menu or modal) will be implemented with the provided JavaScript snippets in the next milestone. In this milestone, your interactivity should only be initialized (i.e. the page loads with the menu and modal in their default state).
This includes, but is not limited to:
- HTML
data-attributes - The CSS
:targetpseudo-class (e.g.<a href="#menu">links that show/hide the menu) - The "checkbox hack" (e.g.
<input type="checkbox">with the CSS:checkedpseudo-class) - The
<details>and<summary>HTML elements - The
popoverHTML attribute - The CSS
:focus,:focus-within, or:has()pseudo-classes to show/hide interactivity
- HTML
-
You may not code your interactivity's JavaScript in this milestone.
JavaScript is prohibited. You will receive a 0 for the entire milestone if you include any JavaScript code. (You need to demonstrate that you understand how to build a fully responsive website with only HTML and CSS first.)
-
You may not code any animations.
-
You may not include any hotlinked resources.
All resources should be local to your repository/website.
You may not embed videos (or other resources) from other websites, like YouTube or Instagram.
You may not use Google Fonts. However, you may download font files and include them locally in your repository and use them via
@font-facein your CSS. -
You may not use any CSS libraries or frameworks (e.g. Bootstrap, Tailwind, etc.) or hotlinked font resources.
You may not copy their code into your CSS either. (If your CSS classes use same name as a framework class, you will receive no credit for your CSS.)
-
You may not use HTML forms on your website.
Forms require server-side code. We can only program client-side (front-end) code in this course.
You may not use the
<input>,<textarea>,<select>,<option>,<form>HTML elements.
Milestone Instructions
In this milestone you will revise your existing website's design to incorporate static client-side interactivity (hamburger menu and modal) and implement a fully responsive website using only HTML and CSS.
-
You may stage, commit, and push as many times as you want to back up your work. Responsible UX engineers back up their work frequently.
-
Please don't wait until the last minute; technologies don't always cooperate and require some fiddling, especially the first time you use them.
Each milestone builds on the previous milestone. If you are going to use your resubmission accommodation for Milestone 2, you should do so before starting Milestone 3.
If you wait until after starting Milestone 3, you will have to undo your Milestone 3 work to resubmit Milestone 2.
No milestone 3 work may be present in milestone 2 resubmissions. If milestone 3 work is present in your milestone 2 resubmission, you will receive a 0 for milestone 2. No exceptions.
Review the Project Requirements
When working for a client, you'll need to check their requirements frequently to ensure you're meeting their expectations. You don't want to spend weeks working on something only to discover at the last minute that what you've been working on doesn't meet their requirements.
Carefully read the milestone requirements. I would strongly encourage you to take notes when reviewing the requirements. (Taking notes will help you remember the requirements while you're working on the milestone.)
Synchronize your Repository
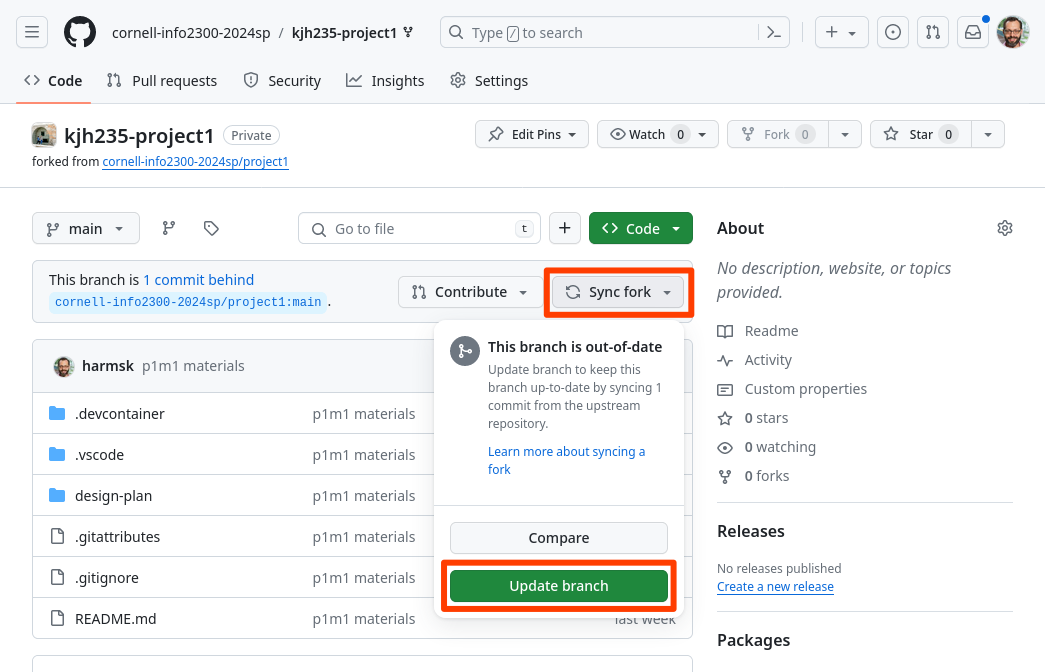
Synchronize your repository to obtain the Milestone 3 resources.
-
View your project repository on GitHub. Select Sync fork and then Update branch. This will synchronize the milestone 3 resources into your repository.
-
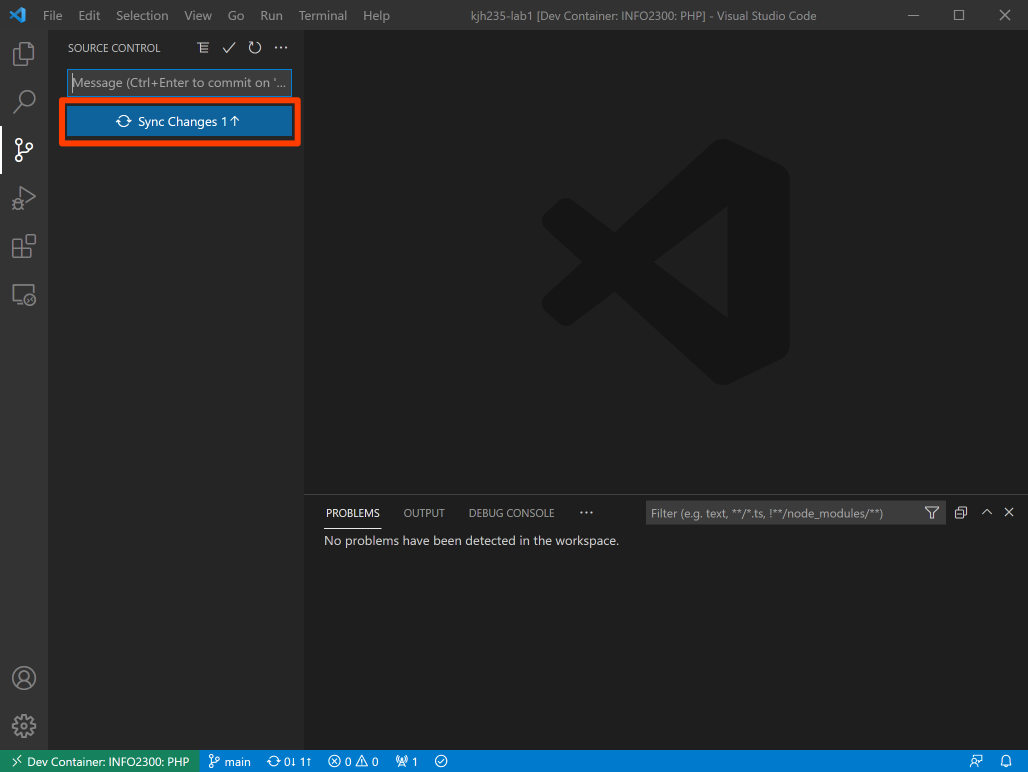
In your codespace, open the Source Control pane from the Activity Bar and click Sync Changes.
-
You should now be able to open the design-plan/milestone-3.md design journal in your codespace.
If you do not see the design-plan/milestone-3.md file, visit office hours. (Do not download a copy of the file and try to manually add it to your repository. You will break our ability to grade your assignment.) Avoid asking for help in the discussion forum for this issue. We rarely can resolve these issues in the forum.
Revise your Website's Design to Incorporate Interactivity (Design Sketches)
Review the design requirements and design your website's interactivity in the design journal.
A hamburger menu acts a toggle to show/hide the navigation menu on narrow screens. No hamburger menu (including its button) should be visible for wide screens. To help you get started, here is a design idea for a hamburger menu:
A modal is a pop-up element that appears over the top of the web page when an element is clicked. To help you get started, here is a design idea for a modal:
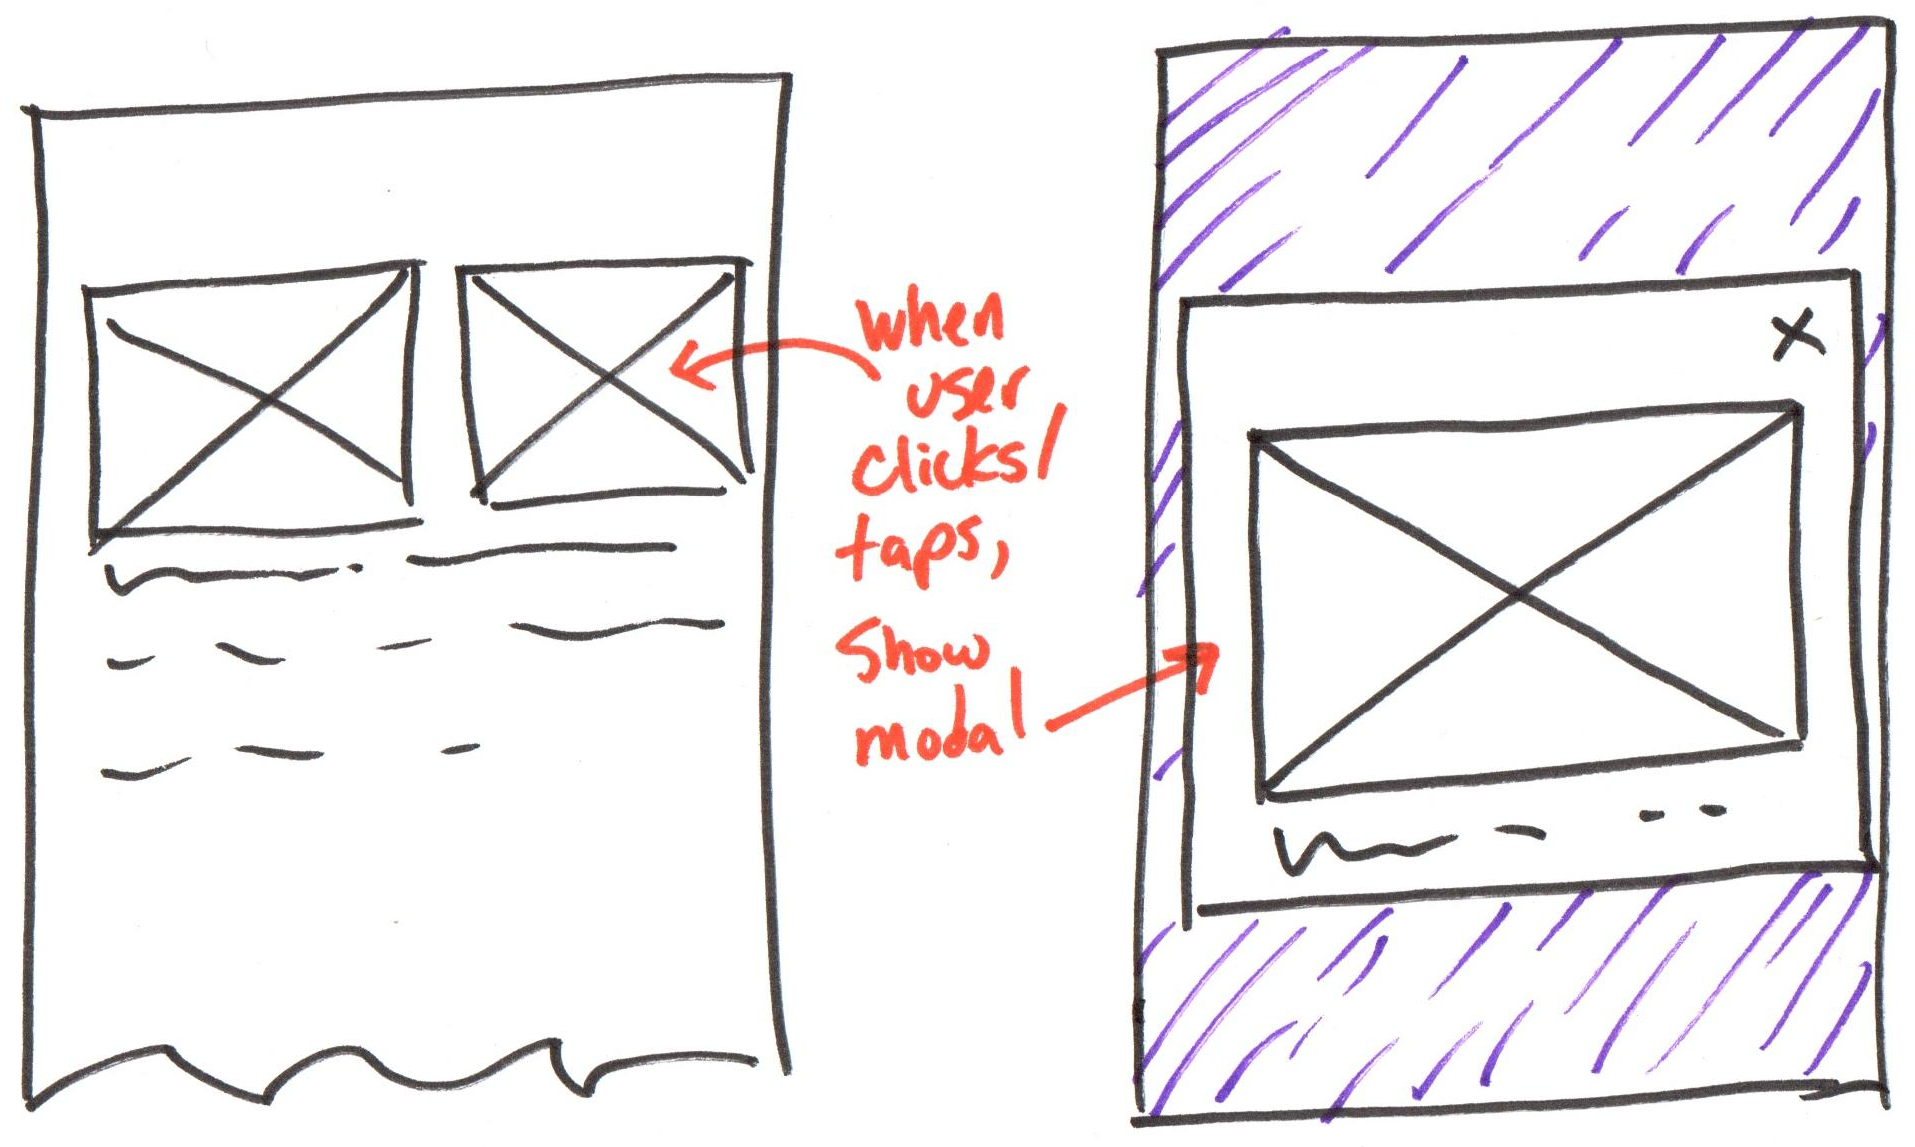
You may use these designs as inspiration. Please note that these designs are incomplete and missing details required for full credit. Copying these designs will not result in any credit.
Brainstorm several ideas for how to utilize modals in your existing website. Your modal should enhance the functionality of the website for its users. Document your brainstorm in the design journal. Once you've explored your ideas for the interactivity, produce at least one design sketch to explore each interactivity's design. (There are several ways to design a hamburger menu and modal.)
Annotate your interactivity's design to explain how it functions (i.e. "Hamburger menu only visible on narrow screens" or "modal appears when thumbnail is clicked/tapped.") Do not add HTML or CSS annotations to your design sketches!
You need not sketch the entire page when designing the interactivity nor all pages of the website. Just sketch enough of the interactivity to communicate to another 1300 student how the interactivity will look and function.
This is a design sketch. It should look how the interactivity will look when the page loads (some stuff may not be visible in this sketch.) You will create a planning sketch in the next step which will include the invisible stuff.
Plan Your Website's Interactivity (Planning Sketches)
Plan your interactivity's implementation in the design journal as an interactivity planning sketch and pseudocode.
Plan the modal first, then plan the drop-down hamburger menu.
-
Create planning sketch(es) for implementing your interactivity.
Your planning sketches should include all HTML elements needed for the interactivity like we practiced in class; annotations for the element types, their unique IDs, and CSS classes; and lastly the initial CSS classes.
You will need an element for the "transparency" effect (and to block clicks to the website underneath the modal) and an element for the modal itself (
<dialog>). The modal element is inside the "transparency" effect element.tipFeedback and affordances are important for usable interactivity. Consider planning your CSS classes for them too. (i.e.
.close-x-button:hover-- darken background on hover) -
Plan your interactivity code in pseudocode.
In the design journal, plan your pseudocode for implementing the JavaScript needed for your interactivity.
Your pseudocode must include the CSS selectors for the elements and the CSS class names that are added or removed, using the IDs and classes from your planning sketches. For example: "when
#hamburger-buttonis clicked, remove the.hiddenclass from#nav-menu." No credit is provided for pseudocode without selectors and class names.Remember that pseudocode is an informal language. There is no standard for it. It should mostly be natural language (i.e. English) like we practiced in class. Do not use JavaScript for your pseudocode; no credit provided for JavaScript.
HintsIf you're using a modal to display a larger image when a user clicks on an image thumbnail, you can include all the large images in one modal and show/hide the "correct" big image depending on which thumbnail button the user clicked/tapped.
Use media queries to show/hide the hamburger button. However, media queries alone are not sufficient to show/hide the navigation menu. You will need to use the
readyevent described in class to show/hide the navigation menu when the page loads because you won't know if it's loading on a narrow or wide screen. When the browser resizes, you will need to show/hide the navigation menu. Just likeclick,resizeis an event you can listen for and add/remove CSS classes in response to.noteYour pseudocode should be sensible to the students in this class. If you're unsure, ask a peer from the class to review your pseudocode.
Code the HTML and CSS for Your Planned Interactivity
Implement the HTML and CSS needed for your hamburger menu and modal interactivity in your website. Style everything so that when every page loads, the interactivity should look exactly like it will when the user first sees it. (i.e. The hamburger button is visible. The modal is hidden.) Do not code any JavaScript. Implement the hamburger menu HTML and CSS on every page.
While the navigation menu will be hidden initially on narrow screens when the interactivity is fully implemented in the next milestone, it's hard to grade a website that doesn't show any navigation. Please have the navigation menu visible initially in this milestone so that it's easier to grade.
Style all interactivity buttons to match the aesthetic of your website's design. (No credit is provided for using the default browser styles for buttons. i.e. the "x" close button for the modal or the hamburger button should not look like a typical button, it should just be an x or the hamburger icon.)
Use the CSS position property to position the "transparency" effect element to fill the entire browser window for the modal. Use flexbox/margins/paddings to position the modal inside the "transparency" effect element.
Use GitHub Copilot for ideas for styling the modal and buttons.
Do not implement any functional interactivity. Do not code any JavaScript. You will receive a 0 for this milestone if you include any JavaScript.
Implement a Fully Responsive Website Using Only HTML and CSS
Fully implement your responsive design from the first milestone. Your website should be fully responsive for both wide and narrow screens as well as fine and coarse pointer devices.
You should employ the responsive design methods we covered in class including relative dimensions, min and max dimensions, media queries, and responsive images.
When finished your website should be professionally designed, polished, and usable on both wide and narrow screens as well as fine and coarse pointer devices.
Design Journal Reflection
Complete the design journal for Milestone 3: design-plan/milestone-3.md
Check your Work
Review the milestone requirements and check that your milestone submission adheres to these requirements.
Double check that your HTML and CSS validate.
Everything in your design journal must be visible in the Markdown preview when using "Markdown: Open Preview" for credit. Not visible = no credit.
Remember that part of developing your professional skills is learning to check your work against requirements. You will not be provided a rubric in industry and I want you to be prepared.
Submission
Stage, commit and push all changed files in your Git repository to the GitHub server. (All commits should reside on the main branch.)
Complete the submission form for project-m3 to submit the assignment.
The submission form asks you to check your submission. Checking your work will ensure you receive credit for this assignment. We ask you to check your submission because this is where some students lose points. It's easy to forget something and checking your work prevents the heartache of getting a 0 because your submission wasn't submitted in a way that we can access and grade it.
Contributors
Copyright © 2017 - 2026:
- Kyle Harms