Homework 3: UI Component Library Prototype
In this homework you'll prepare for the first oral exam by using Vue.js, Tailwindcss, and optionally daisyUI to implement a user interface component library. You'll also plan your sprints using GitHub Issues.
The course material needed to complete this assignment was covered in classes 2-9.
Learning Objectives
- Design an API for reusable user interface components.
- Implement reusable user interface components using Vue.js, Tailwindcss, and optionally daisyUI.
- Plan your units of work as GitHub Issues.
- Compartmentalize your work as commits associated with GitHub Issues.
- Document your component prototype usage with examples.
- Study existing app's designs to identify common components that should exist in a UI component library.
- Publish a prototype as a Progressive Web App (PWA) using GitHub Pages.
Help & Support Resources
We want you to get the help and support you need. Use the course's support resources for help with this assignment.
Git Repository & Codespace
-
Create your assignment repository.
Visit https://landrace.infosci.cornell.edu/courses/info4340-2026fa/repos/hw3 in your browser to create your assignment repository.
-
Contact info4340@cornell.edu to request GitHub Issues be enabled in your Homework 3 repository.
NoticeIf you attended class 8, this was done for you. Otherwise, you will need to create your repository first, and then contact info4340@cornell.edu to request GitHub Issues be enabled in your Homework 3 repository. This requires one business day notice to complete.
This is a manual process completed by the instructor or course assistant that may take up to one business day. It is your responsibility to plan ahead to make this request sufficiently in advance of the assignment's deadline. No flexibility/grace/accommodations are provided for late requests. Professionalism requires planning.
-
Open your assignment repository in GitHub.
After creating your repository, visit https://landrace.infosci.cornell.edu/courses/info4340-2026fa/repos/hw3 in your browser and follow the link to open the repository on github.com
-
Open your assignment repository as a codespace.
Submission Requirements
Professionalism means meeting the client's requirements. Not doing less and not doing more.
Your submission should meet the requirements specified for this assignment and no more (or less). If you do more than the requirements, you will receive a 0 for the assignment. If you do less than the requirements, you will receive a 0 for the assignment.
Your assignment should meet the following requirements for credit:
-
Submit your own original work (design and code) for this assignment.
No credit is provided for submitting design and/or code that is taken from the course-provided examples.
-
Your code should be original. However, the structure of the code will mirror the class examples.
The structure of your code will align with the class examples. This is to be expected.
-
You are required to use the methods and techniques covered in class.
ImportantNo credit is provided for using methods that are not covered in this class.
You may not use any methods that have not been covered in class prior to the release of this assignment.
-
Your assignment's prototype should be visible in the browser and functional upon launching the development web server using Run Without Debugging.
If your assignment does not launch using this method or is not visible in the browser after launching the development server, we are unable to provide any credit.
-
All files should be in the location specified in this document for credit.
Professionalism is important. Incorrectly placed files will not be graded; no partial credit is provided either.
-
Follow the submission instructions below.
Submit all materials to your GitHub repository's main branch for this assignment. When you're finished stage, commit, and push your submission to GitHub. Then fill-out the submission form to complete your submission.
Failure to complete the submission form will result in 0 credit; no submission form = no submission. No leniency. No exceptions.
Sprint 1: Button, Switch, and Card Components
Credit: ~30 points. Completion credit provided for meeting the requirements below. No partial credit is provided.
Goal: Plan a sprint using GitHub Issues to design and implement reusable user interface components.
Requirements
For credit, meet the requirements below:
-
Design the API (Application Programming Interface) for the following components: button, switch, and card.
- Your API should include only what's necessary to implement the core functionality of the component.
- "Core" functionality means that the component should be able to perform the primary tasks that are utilized in most use cases for that component.
- Do not include any "extra" features in your component API design.
- The components should be reusable and configurable through their API; when another app uses your components, the source code of the component should not require any changes to be used in the different app.
- Your API design will be documented through your prototype's source code; there is no design "document" to submit, etc.
- If you attended class 8, you've already done this.
-
Create a GitHub Issue for each of the following components: button, switch, and card.
- Each issue should have an appropriate title.
- Description, labels, and assignees are optional.
- Associate each of your Git commits with the appropriate issue number.
- No credit for commits that are not associated with an issue or are associated with more than one issue.
- Close each issue when the component is complete.
- You must create the issues in your Homework 3 repository; no credit for issues created in other repositories.
-
Implement the button, switch, and card component prototypes in your Homework 3 repository one issue at a time.
- Organize your commits so that each commit is associated with only one issue.
- Implement only the core functionality for each component.
- Employ the methods and best practices we've covered in class thus far to implement your prototype components.
- Style each component using Tailwindcss and optionally daisyUI.
- A minimal amount of custom CSS is permitted, but shouldn't be necessary for this prototype.
-
Document your component prototypes in
Appby providing several examples of each component in use.- Provide an example for each piece of core functionality. For example, for a button you should probably provide an example for handling click events and an example for disabling the button.
- "Document" here does not mean write documentation. This is a prototype. Let the code speak for itself.
- The examples in
Appmay be included with the component issue, or you may create an issue to implement the examples inApp.
-
You may only use the methods covered thus far in class (classes 2-8) for this sprint.
- You may only use Vue.js (version 3) and its composition API to program your prototype. (These are the methods covered in class.)
- You may create your own components, pass props, use reactive variables, bind props to reactive variables, handle events, emit events, conditionally render using
v-if, conditionally style elements using:classbindings, use thev-fordirective to render lists of elements, employ watchers to react to changes in reactive variables, bind inputs to reactive variables withv-model, and use slots to pass content between components. - You may use Tailwindcss and daisyUI to style your components. (These are the methods covered in class.)
- 0 credit is provided if any other methods are used to implement your prototype. No exceptions. No leniency.
Instructions
While you may use AI to complete this assignment, remember the purpose of these assignments is to practice the material from class. You will be asked to do something very similar in your first oral exam. In that exam you will not be permitted to use AI in any capacity.
You are highly encouraged to complete this assignment yourself without using AI. Doing so will help you learn the material and prepare for your first oral exam.
-
(Class activity) Design the API for a button, switch, and card components.
-
Create a GitHub Issue for each component.
noteIf you don't see Issues in your repository, follow the Git Repository & Codespace instructions above to request that GitHub Issues be enabled in your Homework 3 repository.
-
Implement the button, switch, and card component prototypes in your Homework 3 repository one issue at a time.
tipRemember, this is a prototype. Implement only the core functionality for each component and nothing more.
-
Document your component prototypes in
Appby providing several examples of each component in use. -
Close each issue when the component is complete.
Submission
Stage, commit and push all changed files in your Git repository to the GitHub server. (All commits should reside on the main branch.)
Complete the submission form for hw3, sprint1 to submit the assignment.
The submission form asks you to check your submission. Checking your work will ensure you receive credit for this assignment. We ask you to check your submission because this is where some students lose points. It's easy to forget something and checking your work prevents the heartache of getting a 0 because your submission wasn't submitted in a way that we can access and grade it.
Sprint 2: Installable App Prototype
Credit: ~40 points. Completion credit provided for meeting the requirements below. No partial credit is provided.
Goal: Create an installable app prototype that documents the functionality of your UI component library.
Requirements
For credit, meet the requirements below:
-
Create an installable progressive web app (PWA) that documents the functionality of your UI component library.
- Your PWA should be installable from GitHub Pages (no credit for installable PWAs from the development server).
- Your PWA should be functional and usable after installing it via Chrome on a laptop device.
-
Design and implement 3 additional components that are necessary to implement an "image conversion" app.
-
Before implementing a component, create an issue for the component in your Homework 3 repository.
-
Each component should be implemented as a separate issue.
-
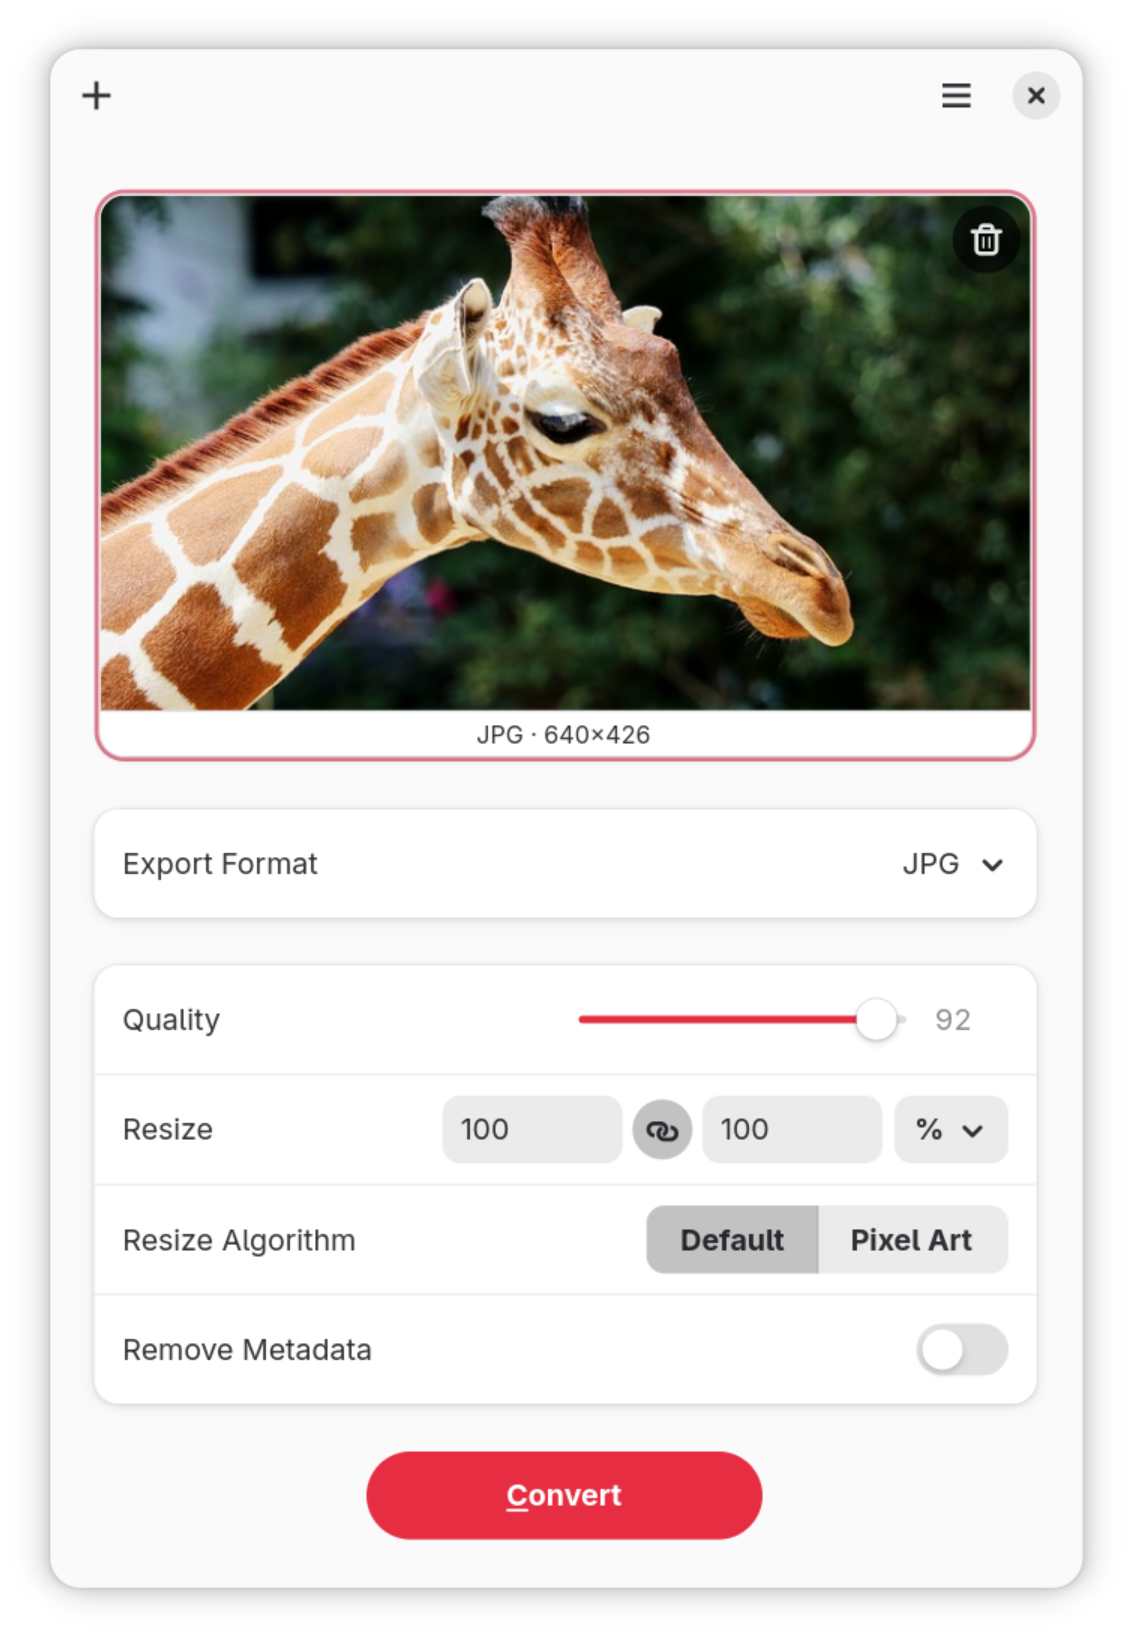
Pick 3 additional components to implement for your UI component library from the following app's design:
-
These components should be designed and implemented in the same way as the button, switch, and card components in Sprint 1.
-
You may modify the components from the first sprint if you create a new issue for the modification and associate your commits with that issue.
-
You may not count modifications to the sprint 1 components as one of your 3 additional components for this sprint.
-
Document your component prototypes in
Appby providing several examples of each component in use. -
Provide an example for each piece of core functionality.
-
-
Create a GitHub Issue for each task in this sprint.
- This includes an issue for creating the PWA.
- Each issue should have an appropriate title.
- Description, labels, and assignees are optional.
- Associate each of your Git commits with the appropriate issue number.
- No credit for commits that are not associated with an issue or are associated with more than one issue.
- Close each issue when the component is complete.
- You must create the issues in your Homework 3 repository; no credit for issues created in other repositories.
Instructions
-
Create an issue for creating the installable PWA in your Homework 3 repository.
-
Commit and push your code from your previous parts before starting this part.
-
Merge your
mainbranch withupstream/mainto ensure your code is up to date with the latest changes.Resolve any merge conflicts and commit and push the merged code.
tipUse
git remote updateto fetch the latest changes fromupstream. Then mergeupstream/maininto yourmainbranch.Tip 2If you have a merge conflict with
package-lock.json, runnpm installto regenerate thepackage-lock.jsonwithout the conflict. -
Run
npm installto install any new dependencies from the merge. -
Update the PWA manifest installation attributes in
vite.config.jsandindex.htmlto set the name of your UI component "showcase" app (or leave it "Homework 3"). This will be the name that appears when users install your app.At a minimum you should update the
description, andtheme_colorattributes in the PWA manifest invite.config.jsandtitleinindex.html. -
(Optional) Replace
public/favicon.svgwith your own SVG icon to be used as the icon for your app when installed. -
Run your app using the development server and open it in Chrome on your laptop. Check that it gives you the option to install the app.
If you aren't given the option to install the app, check the Application tab in the Chrome DevTools and select Manifest in the left sidebar. Address any manifest errors.
infoThis step need not work for credit. If this doesn't work try stopping your dev server, running
npm installagain, then running the dev server again, and hard refreshing the page in Chrome (Ctrl + Shift + Ron Windows,Cmd + Shift + Ron Mac).ImportantAfter trying that, if it still doesn't work, continue on to publishing to GitHub Pages in the following steps. It may work with GitHub Pages (which is the part we grade for credit.)
:::
-
Run
npm run buildto build your PWA. -
Publish your built PWA to GitHub Pages:
npm run publish-pwaOnce the command has finished, and you've waited about 2-5 minutes, your PWA should be published to GitHub Pages.
Visit
https://cornell-info4340-2026fa.github.io/TODO_YOUR_REPO_NAME/in Chrome. Test that your prototype is functional.tipSometimes GitHub Pages fails to publish after running
npm run publish-pwa. Visit the GitHub Pages settings for your homework repository (https://github.com/cornell-info4340-2026fa/TODO_YOUR_REPO_NAME/settings/pages) and make sure the branch is set togh-pagesand the folder is set to/ (root). If it isn't, change the settings to match that and save. Then wait a few minutes and check your published PWA again.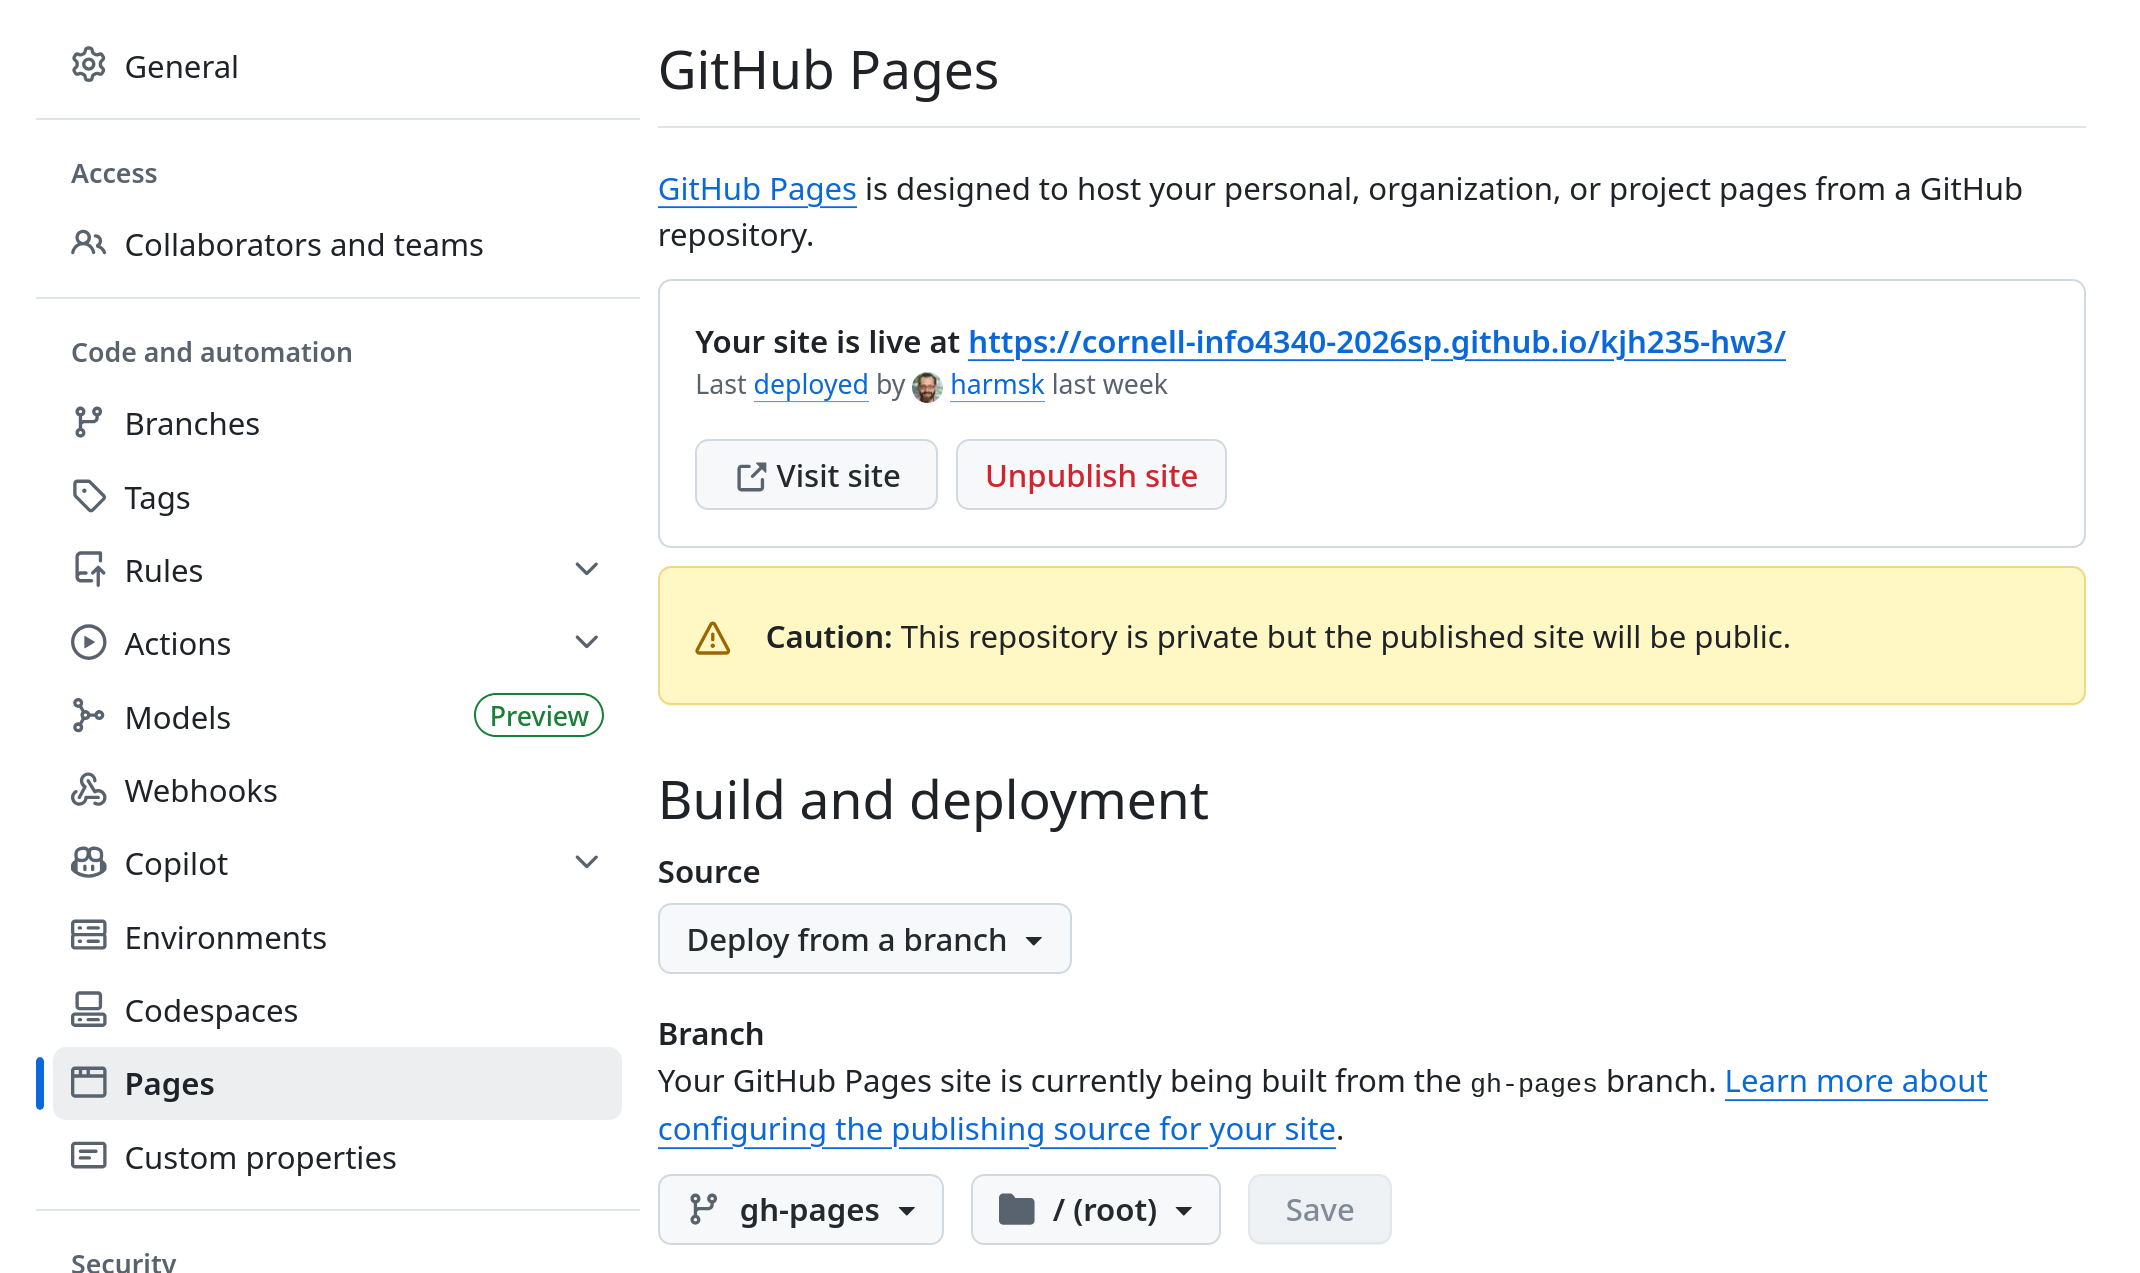
You may also need to hard refresh the page in Chrome (
Ctrl + Shift + Ron Windows,Cmd + Shift + Ron Mac) to see the changes. -
Install your published PWA from Chrome.
-
Design and implement 3 additional components that are necessary to implement an "image conversion" app.
Before implementing a component, create an issue for the component in your Homework 3 repository.
Pick 3 additional components to implement for your UI component library from the following app's design:
These components should be designed and implemented in the same way as the button, switch, and card components in Sprint 1.
Document your component prototypes in
Appby providing several examples of each component in use.Provide an example for each piece of core functionality.
You may use any of the methods covered in class thus far (classes 2-9) to implement these components.
noteYou are not implementing this "image conversion" app. You are only implementing 3 of the components that would be necessary to implement such an app.
This app's design is meant to provide you with inspiration for the common components that should likely exist in a UI component library.
tipIf you implement the button group / segmented button component, you will need to use template refs. While we have not learned this in class, if you want to push yourself and learn something new, you are permitted to use template refs to implement this component.
-
Re-publish your built PWA to GitHub Pages and test that installation works and your prototype is functional as an installable PWA via Chrome on the desktop.
Submission
Stage, commit and push all changed files in your Git repository to the GitHub server. (All commits should reside on the main branch.)
Complete the submission form for hw3, sprint2 to submit the assignment.
The submission form asks you to check your submission. Checking your work will ensure you receive credit for this assignment. We ask you to check your submission because this is where some students lose points. It's easy to forget something and checking your work prevents the heartache of getting a 0 because your submission wasn't submitted in a way that we can access and grade it.
Contributors
Copyright © 2026:
- Kyle Harms