Homework 4: Chat Prototype
In this homework, you will implement a chat prototype in Vue.js.
You will need a laptop that supports WebGPU to complete this assignment.
Learning Objectives
- Implement a prototype app in Vue.js from a reference design.
- Employ TailwindCSS utility classes to style a Vue.js app.
- Use the composition API to manage state and implement interactivity in a Vue.js app.
- Use the
v-fordirective to render a list of items in Vue.js. - Store complex data (i.e. an array of objects) in a
refand use it to manage state in a Vue.js app. - Respond to keyboard events in Vue.js.
Help & Support Resources
We want you to get the help and support you need. Use the course's support resources for help with this assignment.
Git Repository & Codespace
-
Create your submission repository.
Visit https://landrace.infosci.cornell.edu/courses/info4340-2026sp/repos/hw4 in your browser.
-
Open your repository in GitHub.
After creating your repository, visit https://landrace.infosci.cornell.edu/courses/info4340-2026sp/repos/hw4 in your browser and follow the link to open the repository on github.com.
-
Open your repository as a codespace.
Overview
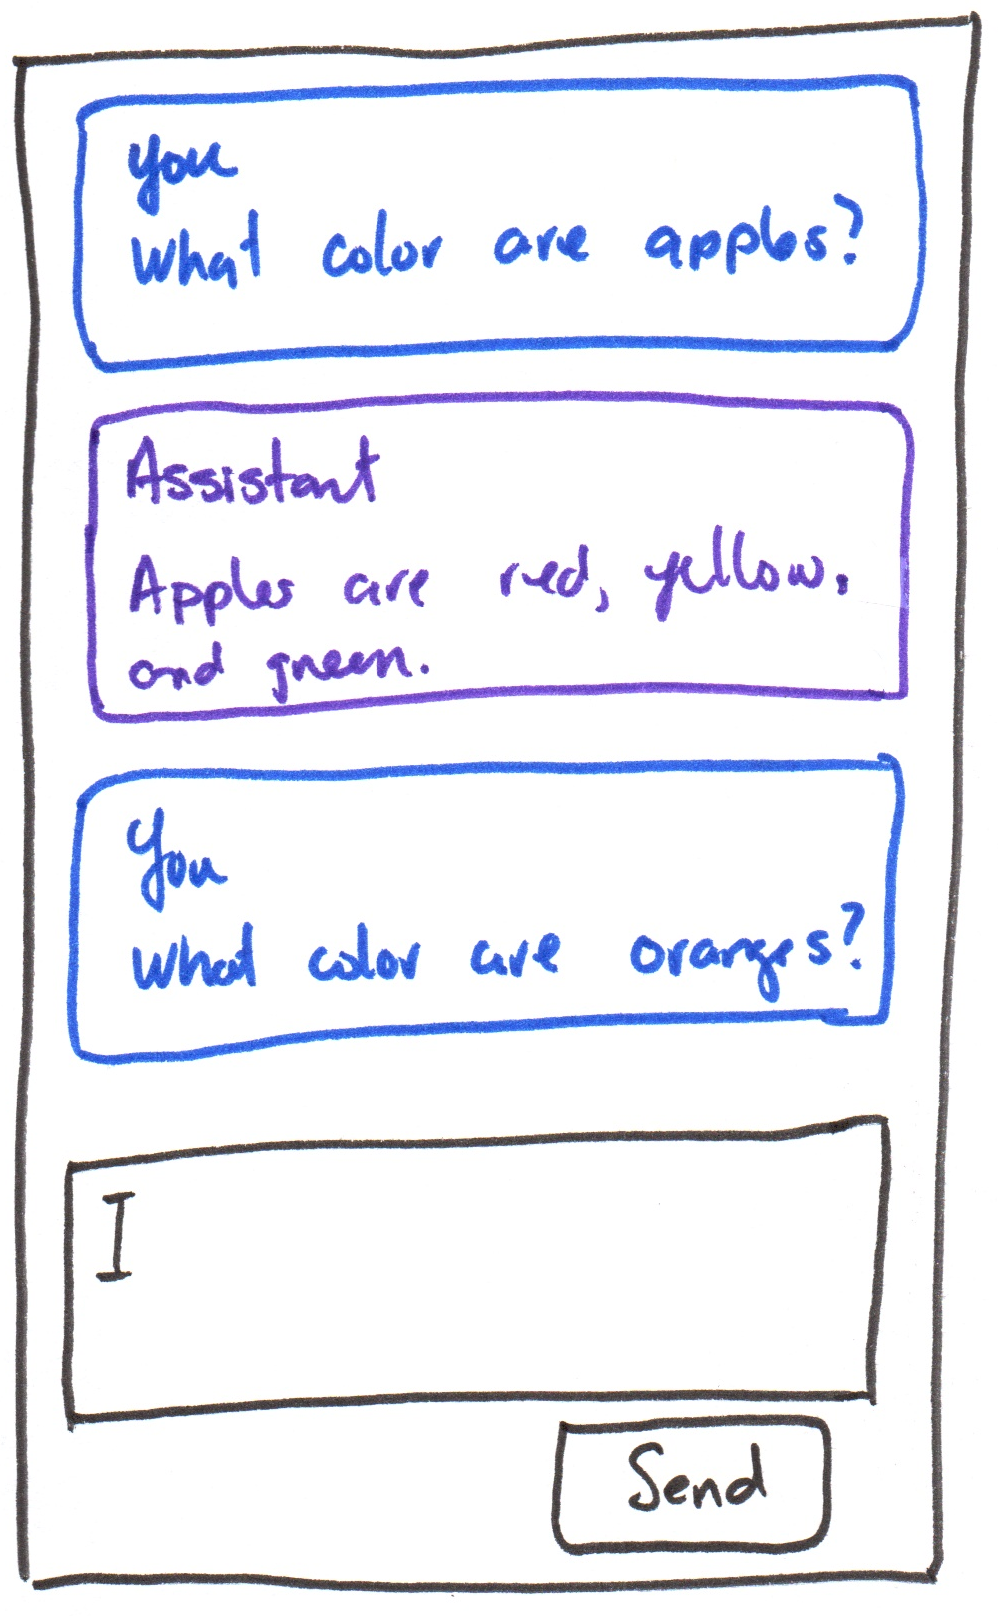
You will implement a chat prototype in Vue.js using the following design:
Requirements
Use only TailwindCSS utility classes for styling; no custom CSS is allowed.
All resources should be hosted locally; no CDN links; no hotlinking.
Use the composition API and only the methods and directives covered in class so far. No credit is provided for using additional Vue.js features not yet covered in class. No exceptions.
Part I: Components
Credit: ~8 points. Completion credit provided for meeting all the requirements below.
Implement the reference design using accessible HTML and TailwindCSS utility classes. (Your implementation need not be exact, but it should be close and should capture the overall layout, structure, and styling of the reference design.)
Create a ChatMessageItem component that displays a chat message and role (i.e. "user" or "assistant"). Add two instances of the ChatMessageItem component to App to represent a user message and an assistant message. Hard-code the sample text in the reference design for the content of the messages. (Your sample chat messages may be anything you like, they need not be the same as the reference design.)
Add a text box and a button to send messages at the bottom of the app using accessible HTML. (Note, a <form> element better promotes accessible HTML.) The text box and button should not be functional for this part; you are only implementing the static layout and styling for this part.
The reference design has a list of chat messages. Your HTML structure should reflect this.
You may have exactly 2 components (App and ChatMessageItem) for this part.
Part II: List Rendering
Credit: ~8 points. Completion credit provided for meeting all the requirements below.
Implement rendering a list of chat messages in the App component using the v-for directive.
Create a ref in App that stores an array of chat messages. Each message should be an object with two properties: role (i.e. "user" or "assistant") and content (the text content of the message). Place your hard-coded sample messages in the array of chat messages ref to verify that your list rendering works correctly.
Replace the hard-coded instances of ChatMessageItem in App with a single instance of ChatMessageItem that is rendered for each message in the array of chat messages using the v-for directive.
Part III: Append Messages
Credit: ~8 points. Completion credit provided for meeting all the requirements below.
Implement functionality to append new messages to the list of chat messages in App when the user types a message into the text box and clicks the send button or presses the Enter key when typing into the text box.
When the user clicks the send button (or presses enter while typing into the text box), the content of the text box should be added as a new message to the list of chat messages with the role of "user". After appending the new message, clear the text box.
Do not remove the hard-coded sample messages in the array of chat messages ref; you should be able to see the new messages you append as well as the original sample messages.
Part IV: LLM Integration
Credit: ~8 points. Completion credit provided for meeting all the requirements below.
In this part, you will use WebLLM to run a local LLM in the browser to prototype a simple chatbot.
-
Merge your
mainbranch withupstream/main. -
Install WebLLM.
npm install @mlc-ai/web-llm -
Import the provided
WebLlmChatEnginelibrary inApp.vue.import WebLlmChatEngine from "./lib/WebLlmChatEngine"; -
Initialize the
WebLlmChatEngineinApp.vue.const status = ref("");
const progressText = ref("");
const isEngineReady = ref(false);
function handleAssistantContent(assistantContent) {
// TODO: append the assistant's response as a new message to the list of chat messages
// {
// role: "assistant",
// content: assistantContent
// }
}
function handleEngineStateChange({ status: nextStatus, progressText: nextProgressText, isReady }) {
status.value = nextStatus;
progressText.value = nextProgressText;
isEngineReady.value = isReady;
}
const llmEngine = new WebLlmChatEngine(
"SmolLM2-360M-Instruct-q4f16_1-MLC",
handleAssistantContent,
handleEngineStateChange
);
llmEngine.init() -
Add LLM status to the prototype's interface.
<div>
  <p>Status: {{ status }}</p>
  <p>{{ progressText }}</p>
</div> -
Implement the chat functionality.
Call the
sendMessagefunction below when the "Send" button is clicked or when the Enter key is pressed in the chat input text box:async function sendMessage() {
const content = // TODO: get the content of the chat input text box
const messages = [
{
role: "system",
content: "Your responses should be short and concise."
},
{
role: "user",
content: content
},
];
await llmEngine.sendMessage(messages);
} -
Test that your chat prototype is functional.
If it's not functional, troubleshoot your code and fix any issues.
Part V: Functional ChatBot Prototype
Credit: ~8 points. Completion credit provided for meeting all the requirements below.
Develop your own chat prototype by developing your own system prompt and selecting a model that works well with your system prompt. (You may remove the sample hard-coded messages if you like; they are not required for credit in the final submission.)
See WebLLM's documentation for available models: https://github.com/mlc-ai/web-llm/blob/main/src/config.ts#L313
Your model should be fast and small (<= ~1B parameters) to ensure that it can run efficiently in the browser.
Reduced precision (e.g. 16-bit floating point, 8-bit integer, etc.) and quantization (e.g. 4-bit, 2-bit, etc.) can also help reduce the computational resources required to run the model.
Your ChatBot need not be about anything in particular. The point of this assignment is to explore how to work with an LLM in a prototype. Feel free to have some fun and use your creativity to come up with an interesting bot.
Your ChatBot should respond within a reasonable amount of time (e.g. no more than 1-2 minutes) for credit.
If your ChatBot is taking a long time to respond, consider updating your system prompt to make it more concise and/or selecting a smaller/faster model.
Submission
Stage, commit and push all changed files in your Git repository to the GitHub server. (All commits should reside on the main branch.)
Complete the submission form for hw4 to submit the assignment.
Note: The submission form asks you to check your submission. Checking your work will ensure you receive credit for this assignment. We ask you to check your submission because this is where some students lose points. It's easy to forget something and checking your work prevents the heartache of getting a 0 because your submission wasn't submitted in a way that we can access and grade it.
Contributors
Copyright © 2023 - 2026:
- Kyle Harms